Agile@School – Anno quinto, ep. 7

Settima lezione. Questa volta non parleremo dell’essere “online” a lezione come precedentemente descritto, ormai è un dato di fatto. Notizia di oggi, invece, quella che oltre agli esami di maturità effettuati online, in caso di protrarsi della situazione di emergenza, a settembre tutte le lezioni verranno tenute in didattica a distanza. In tal caso direi che siamo già pronti.

In questa lezione, i ragazzi hanno potuto provare con mano cosa accade quando non si applica una metodologia agile; il professore si infuria! Ma quali sono stati i passi falsi? Proviamo a vederli più in dettaglio, al fine di analizzare meglio la problematica ed evitare che si ripeta in futuro.

Uso scorretto degli strumenti e disorganizzazione

In un caso, il codice scritto da ciascuno dei membri di un team non è stato portato sul repository GitHub, bensì unicamente memorizzato sul proprio computer. E non è nemmeno stato installato il software necessario per interfacciarsi al source control. Nell’altro, non siamo stati in grado di vedere nulla. Indovinate il motivo… nessuno dei membri del gruppo aveva a disposizione un computer dal quale poter condividere lo schermo, poiché erano tutti collegati solo tramite smartphone.

Entrambi i casi rappresentano punti critici nell’adozione dell’agile development:

  • nel primo, la mancata adozione degli strumenti e dei processi scelti, che in un ambito aziendale hanno una precisa ragione d’essere. Possibili conseguenze sono disallineamento nel codice e introduzione di anomalie, se non addirittura perdita di codice (“se si rompe il PC?”);
  • il secondo, la mancanza di organizzazione, che è un sottoinsieme della mancanza di comunicazione, punto chiave della mentalità agile: in questo caso, pensate alla “brutta figura” che si fa nel non presentare nulla ai committenti perché nessuno ha un computer. Quasi anacronistico. E pensare a un piano di riserva?

Torniamo alla teoria: la documentazione

Siamo certi che i ragazzi abbiano imparato tanto da questa serie di difficoltà. Tuttavia, nonostante il blocco, la lezione è andata avanti con un po’ di teoria. Oggi è stato il momento della documentazione, aspetto spesso trascurato, se non frainteso, dello sviluppo del software. Avete sentito bene, dello “sviluppo del software”. Nessuno si può salvare, nemmeno gli sviluppatori.

Pier-Paolo ha quindi evidenziato la differenza fra la documentazione tecnica e quella funzionale, entrambe necessarie, ma diverse sia nell’obiettivo/destinatario che nella stesura. Se nella prima è possibile adottare un linguaggio di settore e scendere nel dettaglio delle implementazioni (pratica consigliata per favorire la documentazione interna del team), nella documentazione funzionale troveremo una descrizione dell’operatività, corredata di schermate ed esempi concreti. Non dimentichiamo che quest’ultima è rivolta soprattutto all’utente finale del software.

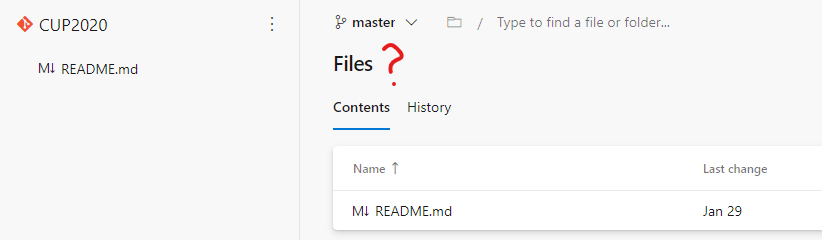
Per far capire meglio questo aspetto abbiamo mostrato ai ragazzi alcuni esempi di quanto realmente realizzato sul lavoro e abbiamo dato loro due semplici esercizi: uno, provare a compilare il file README.md sul repository GitHub, con una descrizione del proprio progetto e le istruzioni per scaricarlo e aprirlo; due, disegnare alcune schermate di come immaginano l’interfaccia utente che il loro software deve avere, utilizzando gli strumenti di mocking che preferiscono.

Conclusioni

La lezione si è chiusa con la presentazione del codice degli altri gruppi, quelli che hanno commesso meno errori dei primi. Una cosa ci ha colpito in particolare, la realizzazione del progetto “Casinò online”, in quanto i ragazzi hanno già adottato una soluzione che facilita l’integrazione del codice in un’interfaccia grafica; un approccio quasi da architetti software, bravi!

Ci avviciniamo purtroppo alla fine del nostro percorso, alla sfida finale, quasi al boss di fine gioco. La prossima volta i ragazzi dovranno presentare tutto quanto fatto. Siamo proprio ansiosi di vedere come lo step finale verrà affrontato da ognuno di loro. Le scelte di chi presenterà, come, gli strumenti ed, ultimo ma non per importanza, come gestiranno i tempi.

Agile@School – anno quinto, ep. 6

Siamo arrivati al sesto incontro con i ragazzi. La quarantena non ci lascia tregua ma noi siamo più tenaci e non molliamo di certo! Ormai l’incontro su Microsoft Teams è consolidato e sarà il fatto che è ora di colazione o che ci troviamo tutti “insieme” ma a casa, insomma, ci si sente quasi in famiglia.

Ma bando alle ciance, perché oggi tocca al branching su Git, pratica molto utile e consigliata nell’utilizzo quotidiano, ma allo stesso tempo complessa e insidiosa.

[…] il branching risulta essenziale per poter testare l’efficienza di implementazioni differenti o per realizzare dei proof-of-concept in corso d’opera.

Chi sviluppa conosce bene il tema, essendo vita di tutti i giorni. Tuttavia, in certi frangenti, è necessario chiedere aiuto alla documentazione o a chi può esserci di aiuto. Per questo motivo Pier-Paolo, con tanta pazienza, ha preferito mantenere un livello di applicazione piuttosto semplice, portando esempi pratici tratti dalla nostra esperienza lavorativa aziendale, per meglio dimostrare ai ragazzi la reale utilità di questo strumento.

Il branching, il nostro miglior alleato

I vantaggi del branching non si limitano al fatto di poter sviluppare funzionalità differenti in parallelo o da sviluppatori differenti. Infatti, risulta essenziale per poter testare l’efficienza di implementazioni differenti o per realizzare dei proof-of-concept in corso d’opera. Pier-Paolo ha inoltre evidenziato l’eventualità, in realtà fin troppo frequente, del verificarsi di conflitti nel codice al momento del merge dei vari branch su quello principale di sviluppo. E cosa ha deciso di far provare ai ragazzi?

The “git flow” branching model
gitflow, esempio di branching su git

Reazioni dei ragazzi ai primi conflitti

Il caso più semplice che abbiamo sottoposto ai ragazzi si verifica quando due o più sviluppatori modificano il medesimo file in punti differenti. Ma siamo arrivati al caso più critico, quello di un file modificato nello stesso punto. Abbiamo seguito insieme i passi necessari per risolvere i conflitti tramite SmartGit e la condivisione dello schermo (vedi smart learning).

La lezione è stata davvero impegnativa, ma i ragazzi sembrano aver seguito con attenzione e compreso bene, reagendo con prontezza grazie anche alle indicazioni degli strumenti ai quali sono abituati.

Durante la prossima lezione vedremo molto probabilmente qualche risultato tangibile in termini di prodotto. Di certo parleremo di documentazione funzionale destinata all’utente finale, aspetto spesso tralasciato in favore della realizzazione tecnica del software.

Continuate a seguirci, l’esperimento delle lezioni online sta procedendo a gonfie vele e ormai manca poco a vederne i risultati finali.

Stay Tuned!

Agile@School – Anno quinto, ep. 4

Vista l’emergenza in corso, è passato un po’ di tempo dall’ultimo aggiornamento e di cose ne sono successe: poco dopo l’ultima lezione, infatti, il Coronavirus ha iniziato a diffondersi e sono state prese contromisure sempre più restrittive per arginare il fenomeno. Si è arrivati infine al divieto per tutti i cittadini di uscire di casa, a meno di emergenze e necessità lavorative.

[…] un’occasione per sperimentare una nuova condizione, per mettere alla prova gli strumenti che usiamo tutti i giorni sul lavoro.

Da parte nostra, si può dire che abbiamo avuto “fortuna”, sia perché la nostra attività quotidiana (la programmazione) può essere eseguita anche fuori dall’ufficio via telelavoro, sia perché avevamo già predisposto anche prima del virus gli strumenti per metterla in pratica, per cui siamo stati fra i primi ad adottare l’utilizzo dello smart working che ci permette di lavorare da casa. Engage IT Services nasce in telelavoro, da tre persone che non avevano soldi per un ufficio, e oggi, grazie alla filosofia descritta qui, possiamo dire “ragazzi, da lunedì si lavora da casa” senza nessun problema di sorta. Un problema a dire il vero c’è, il caffè insieme, quello ci manca davvero!

Ma cos’è successo nelle scuole? In quella seguita da noi, in particolare, il professore non si è voluto perdere d’animo e, dopo un paio di lezioni sospese per precauzione, ci ha chiesto disponibilità per tenere una delle nostre lezioni in modalità di meeting online con gli studenti: ovviamente abbiamo accettato con entusiasmo, sia perché ci sarebbe dispiaciuto lasciare indietro i ragazzi sugli argomenti che avevamo preparato, sia perché era un’occasione per sperimentare una nuova condizione, per mettere alla prova gli strumenti che usiamo tutti i giorni sul lavoro.

Ed eccoci qui, tutti pronti da casa con Microsoft Teams configurato e avviato in attesa di essere invitati alla “riunione” della classe. SPOILER: la lezione è andata alla grande e ha guadagnato molto dal fatto di essersi svolta online invece che di persona, e nel seguito vedremo il perché.

Partiamo dallo svolgimento della lezione: cominciamo col dire che questa ha avuto un tono molto da “review”; è stato chiesto ai ragazzi, uno per gruppo, di illustrare ciò che avevano fatto in queste settimane (non crediate che se ne siano stati con le mani in mano, anzi) evidenziando principalmente quale fosse stata l’organizzazione del team negli sviluppi. Dopo ogni presentazione, abbiamo quindi riesaminato le board per capire se i nuovi PBI fossero stati inseriti correttamente e abbiamo fornito consigli su come migliorarne la stesura.

intro-view.png (728×310)

Particolare attenzione è stata posta ancora una volta sulla disciplina necessaria ad adottare una serie di processi. Sebbene in un ambiente scolastico essi possano risultare “pesanti”, a lungo termine non possono che incrementare consapevolezza ed efficienza nel modo di lavorare.

Tutto questo è avvenutotramite schermo condiviso e ciò ha permesso una partecipazione forse più diretta rispetto ad una lezione frontale in cui i ragazzi spesso non riescono a condividere quanto implementato o a interagire direttamente su quanto mostra il professore.
Nonostante molti ragazzi non disponessero di un computer e si fossero collegati con smartphone o tablet, l’impressione è stata che la lezione si trasformasse in qualcosa di più personale. Le distanze “fisiche”, già inevitabili in classe e in questo frangente anche più estese, si sono praticamente annullate. E questo ha portato molta più partecipazione.

[…] essere reattivi al cambiamento sia un processo fondamentale di ognuno di noi, azienda o individuo.

La lezione è terminata con la richiesta di collegare i repository GitHub dei ragazzi alla nostra board Azure, per poter mostrare loro la prossima volta l’integrazione fra i due mondi: abbiamo quindi mostrato la procedura per la creazione dei Personal Access Token, toccando così anche l’argomento sicurezza nella gestione dei repository.

L’aspetto su cui Pier-Paolo insisterà nella prossima lezione è quello della creazione di valore aggiunto ad ogni iterazione: sembra infatti essere presente un po’ di “dispersione” negli sviluppi. Anche il professor Memoli ha richiesto, dal canto suo, che i ragazzi mostrassero qualcosa di funzionante e tangibile per evidenziare tale problematica.

Il primo esperimento si può quindi dire concluso con successo e non vediamo l’ora di proseguire con la prossima lezione per avere conferma delle nostre impressioni! Una cosa che vogliamo sottolineare è che in questo periodo di emergenza, non solo chi sfrutta i nostri servizi cambia. Cambiamo anche noi e questo non fa altro che incrementare la consapevolezza di come essere reattivi al cambiamento sia un processo fondamentale di ognuno di noi, azienda o individio. Questi ragazzi ci hanno dato un insegnamento non piccolo. Si può fare!

Agile@School – Anno quinto, il progetto in remoto

Si sente spesso dire che la scuola non ha tutti gli strumenti per poter fronteggiare formazione in remoto. In generale, il mondo della formazione scolastica è considerato talvolta un po’ arretrato. In realtà, l’istituto che stiamo seguendo, sia con progetti paralleli, sia come alternanza scuola-lavoro è ed è sempre stata all’avanguardia. Forse sono un po’ di parte, visto che si tratta della scuola in cui ho studiato, ma credo che meriti una degna menzione.

Ancor prima che io potessi contattare i professori per tentare il progetto in remoto, ho ricevuto una telefonata dal professor Christian Memoli che, riassumendo, chiedeva: “abbiamo tutto per fare da remoto, abbiamo Teams, abbiamo strumenti di video conferenza, è un problema per la tua azienda? Noi stiamo già facendo didattica a distanza.”. Che cosa posso dire? Prima di tutto, che l’IISS Gadda di Fornovo Taro è pronto, veramente. Poi, nel mondo del lavoro di cui noi informatici siamo parte, non spesso il telelavoro è ben visto, mentre una scuola dimostra un sentimento responsabile e proattivo.

Attenzione, non fraintendetemi, per la nostra azienda, TUTTI e sottolineo TUTTI i clienti e i fornitori hanno condiviso, chiesto e supportato il lavoro da remoto. Però conosco casi in cui, seppure possibile come strada da percorrere, il telelavoro non è ancora ben visto. Per fortuna la nostra realtà aziendale non ha questo tipo di conflitto, anzi! Consapevolezza e responsabilità vanno per la maggiore, unitamente al rispetto per la salute di tutti.

A partire da mercoledì, seguiremo una serie di incontri (purtroppo ancora fino a data da destinarsi) utilizzando Microsoft Teams (strumento già utilizzato dalla scuola regolarmente), connettendosi in Azure DevOps Services e sfruttando GitHub come già indicato nei post precedenti della serie. Il tutto da remoto! Sento che questo progetto, già interessante, non farà altro che diventarlo ancora di più. Dimostreremo le possibilità dell’informatica, terremo comunque i ragazzi interessati e chiuderemo il progetto, senza farci fermare dallo spazio fisico.

Non vedo l’ora, stay tuned!

Agile@School – Anno quinto, ep. 2

Eccoci arrivati alla seconda lezione, cominciamo finalmente a fare sul serio!

La volta scorsa avevamo chiesto ai ragazzi di provare a inserire le user story sulle board dei loro progetti. Ora, le board erano lande desolate… Forse la causa è da attribuire al concetto di user story, che può essere in qualche modo complesso e non facile da “digerire”. Oppure il motivo è da ricercare in una gita in Spagna di mezzo?

Nessun problema, è comprensibile che le user story non siano di immediata comprensione, soprattutto per questi ragazzi che sono chiamati ad essere clienti, PO e sviluppatori nello stesso tempo. Soprattutto un portale con così tante feature, non è semplice da navigare, per cui, armati di pazienza, Pier-Paolo ha ripreso i concetti daccapo e li ha approfonditi con esempi concreti.

Questa volta, invertendo di fatto il modus operandi della lezione precedente, ha provato a dare molta più importanza alla pratica, quindi, insieme ai docenti ha seguito i ragazzi nel data entry sulle board.

I gruppi avevano già compilato a inizio corso un elenco di attività da eseguire per sviluppare i loro software: chi salvato su un foglio Excel condiviso sul cloud, ben formattato (soprattutto i gruppi con ragazze, sempre precise), chi invece su un file di testo, copiato per ogni studente, aggiornato via email (questo invece sarà un buon punto di partenza per una delle prossime lezioni, ndr). I ragazzi sono comunque stati veloci ad apprendere e, dopo un primo approccio, hanno iniziato anche ad appassionarsi. Si è vista la crescente curiosità rivola a come si gestiscono gli item e a come dovrebbero essere compilati. Sta crescendo la loro parte proattiva, nulla di più bello da vedere in una classe.

Per terminare rilassandosi un po’, Pier-Paolo ha insegnato poi il poker!

Non quello vero, naturalmente, anche se uno dei progetti è un Casinò virtuale, ma il planning poker. E qui proprio il gruppo che sviluppa il Casinò (sarà un caso?) ha immediatamente trovato un sito per poterlo fare online collaborativamente, che è stato subito utilizzato anche dagli altri. Prima abbiamo visto la proattività dei ragazzi, ora siamo addirittura arrivati alla crescita di team. Si bruciano le tappe quando si capisce il valore di alcune nostre azioni!

La lezione è passata piuttosto in fretta, del resto quando ci si diverte accade spesso. Chiudiamo qui con un compito “facile facile” per la prossima volta, cioè inserire i task nei PBI. Chissà se saranno così bravi da buttare giù anche le stime? Vista la crescita, siamo ottimisti 😊

Stay tuned, la prossima volta tocca a Git!

Agile@School – Anno Quinto (2020)

Anche per l’anno 2020 siamo stati coinvolti per continuare il progetto Agile@School, svolto in collaborazione con la scuola I.I.S.S. Gadda di Fornovo. Questa continuità negli anni è sicuramente un buon segno, perché significa che negli scorsi anni il progetto ha dato i suoi frutti e che l’esperienza sul campo acquisita dagli studenti è stata utile.

Ma, per chi ci segue da poco, descriviamo innanzitutto in cosa consiste il progetto Agile@School.
Questo progetto è nato nel 2016 con l’intento di far conoscere agli studenti il cosiddetto modo di lavorare agile, che consiste nell’adozione di tutta una serie di comportamenti e discipline orientate alla collaborazione, al team working e alla condivisione e rielaborazione di informazioni, che stanno trovando sempre più larga diffusione nel campo dello sviluppo software (ma facilmente applicabili anche in altre professioni). La nostra impressione è che negli ambienti educativi si dia ancora troppa importanza all’insegnamento della programmazione pura (indipendentemente dal linguaggio scelto) a scapito di quanto sta “a contorno”, mentre saper programmare e basta è sempre meno sufficiente affinché gli studenti siano più preparati all’ingresso nel mondo del lavoro.

Edizione 2020

Quest’anno abbiamo delle novità: la prima, l’insegnante! A parte infatti la prima lezione che è stata quasi unicamente “conoscitiva”, di presentazione (sia da parte dei ragazzi, sia da parte nostra), in cui siamo stati presenti in due, le prossime lezioni saranno tenute principalmente da Pier-Paolo Mammi, uno dei nostri nuovi colleghi di lavoro, con il quale seguiremo il progetto direttamente “sul campo”.
Altra novità: mentre nelle edizioni passate gli studenti sono stati guidati dall’inizio alla formazione dei team e alla scelta dei progetti, nell’edizione attuale le squadre sono già formate e ognuna ha già portato avanti lo sviluppo software del progetto assegnato (li vedremo nel seguito). Avremo quindi l’occasione di concentrarci maggiormente sulla parte organizzativa del lavoro “a regime” e di mostrare loro le applicazioni dell’agile development, nonché l’utilizzo di strumenti informatici a supporto, che noi stessi utilizziamo nel nostro lavoro.

Il piano d’attacco

I punti principali sui quali insisteremo saranno principalmente tre:
– Team working: strumenti di collaborazione e condivisione, boards;
– Gestione del progetto in modalità agile: cerimonie, utilizzo di Azure DevOps e gestione degli sprint;
– Controllo del codice sorgente: utilizzo di Git e integrazione con Azure DevOps.

Terremo sicuramente delle spiegazioni più teoriche, ma l’ottica sarà quella di far applicare il più possibile i metodi direttamente ai team di studenti, perché è con la pratica (e la perseveranza) che si fissano meglio i concetti. Proveremo inoltre anche ad “aumentare la posta in gioco”, utilizzando in alcuni casi durante le lezioni una terminologia più aziendale che, se da una parte potrà essere poco gradita dai ragazzi, dall’altra li renderà più preparati all’ambiente professionale.

L’impatto

I ragazzi erano inzialmente un po’ timidi, come è lecito aspettarsi quando incontrano qualcuno di nuovo, ma pian piano si sono un po’ sciolti. Abbiamo poi chiesto ai team di presentare brevemente i loro progetti, descrivendone le funzionalità e indagando in particolar modo sulle funzionalità specifiche che prevedono di implementare, a chi è rivolto il software, con quali modalità sviluppano e come si passano codice e documentazione. Questo per avere un’idea di come hanno impostato il loro lavoro, per esempio se avessero già previsto della documentazione condivisa, piuttosto che un sistema di versioning. Diciamo che qui dovremo lavorare con impegno!

I progetti

La classe è stata suddivisa in quattro team, ciascuno composto da 4/5 studenti, di cui uno di questi durante le presentazioni è stato “eletto all’unanimità” come Leader. E qui va un doveroso ringraziamento al professor Christian Memoli, incaricato di seguire la classe, che si fa costante premura di insegnare ai ragazzi i concetti dell’agile development, al di là della pura e semplice programmazione!

Questi sono i progetti scelti dagli studenti, per i quali è già presente una buona base di codice:

Progetto Casinò
Il progetto consiste nella realizzazione di una serie di tipici giochi da Casinò (Black Jack, Roulette, etc.).

Progetto ClasseViva
Gli studenti realizzeranno una versione alternativa e migliorata dell’attuale sistema di gestione delle presenze in aula, integrandolo con notifiche e messaggistica fra professori e genitori.

Progetto CUP
I ragazzi vogliono realizzare un software per la gestione online completa delle prenotazioni delle visite sanitarie.

Progetto TEP
Il software gestirà la prenotazione, l’emissione e la gestione di biglietti per le linee TEP da parte dei cittadini, comprensivo di parte amministrativa per i dipendenti.

Prossimamente

La prima lezione introduttiva al mondo dell’agile si è poi conclusa con l’assegnazione dei compiti a casa ai team. Dopo aver impostato su AzureDevOps un ambiente TFS dedicato al progetto, comprensivo di repository Git per i quattro progetti, abbiamo chiesto ai ragazzi di caricare il loro codice sorgente sul proprio repository e di cominciare a inserire i Product Backlog Items, compilati con le user stories e le attività.
Da qui partiremo nella prossima lezione per espandere i concetti oggi solo accennati, relativi all’utilizzo di AzureDevOps per la gestione delle attività e di Git come sistema di versioning del codice sorgente.

Stay Tuned.

Reducing the gap between operations and development using Azure DevOps

Intro

As we all know, DevOps is culture. In a company that is going to adopt its practices and principles, everyone should be “on the same side”. Continuous improvement cannot be part of our work in IT if we wouldn’t reduce the gap between development and operations. People like me, that worked in the 90s, know that dev and ops were always isolated in silos and this was “the only” way that everyone followed as a suggestion taken from the market leaders. Ticketing systems and extreme bureaucracy acted as a man-in-the-middle between those silos, transforming each organization in two people-unaware endpoints.

Speaking from a DevOps perspective, in such circumstances, a developer couldn’t know anything about how to deploy, where and how is an environment configured. On the other hand, an operation guy couldn’t get anything from a package in terms of what the application has been made for. Due to this gap we often see performance issues, underestimated hardware stuff and delayed releases. Last but not least, what about the lack of commitment and accountability of the employees working on the solution? In short, reducing such a gap is possible using a combination of DevOps culture and the right tools. We will see hereafter how my organization tries to do so using Azure DevOps.

Scenario

Let’s get started with our team (DevTeam hereafter), which is working with agile methodologies, composed of ten developers and a PO. A quick note, we are using a process decision framework called Disciplined Agile (https://www.disciplinedagileconsortium.org/). Then, we have three operation professionals (OpsTeam hereafter). Build and deploy pipelines already exist. Builds are hosted by Azure DevOps and deploys are managed by Octopus Deploy. Getting this has been a difficult mission.

Everything is related to infrastructure in terms of servers, operative systems, virtual hosts, DNS, firewalls, security and so on, is the responsibility of our OpsTeam. As a result, they do many tasks for managing the environments. Here comes the problem. DevTeams used to create tasks in a dedicated backlog, but OpsTeam didn’t. It’s not just a matter of end-of-pipeline tasks, but also tasks for their daily basis work.

Our solution

Modify the tool, adapting its shape in order to fit in with that real scenario. A piece of cake, when you’re DevOps “inside”. How did we change Azure DevOps? Let’s describe what we did in three parts:

Team on Azure DevOps

To create a team in Azure DevOps is really a piece of cake (according to the latest releases). Just navigate to the options and select Teams:

We can add many teams clicking on New team:

We can set the team’s administrators, the permission set and an area under which every work item will be created. This area will be one of our best friends, especially when we will make our queries for gathering and analyzing the team’s related data. Additionally, also the other teams’ members could create items with this area in order to make the OpsTeam aware of them.

Team’s backlog

Now let’s navigate to Backlogs:

Good! The new backlog has been created. Going on it, we will see the team’s drop-down as well as the one for iterations. Great features!

Once created, we will see the teams’ drop-down:

Work items

Now, let’s create a new work item type. We call it Ops item. Navigate to Process customization page:

Before adding the new work item, we must ensure that the process is already a custom process, otherwise, all the edits will be blocked as shown in the following picture:

We’ve already created a SimplifiedScrum process. let’s add our item now:

Now we are going to modify the fields of the new type. Each team should be able to understand all the item’s properties. We will leave the item as is in this example. Then, we have to map the type to the backlog item list, since only the default work item types are shown initially. To do this, navigate to the Process customization page, Backlog Levels tab:

As we can see, we can also set the default item for our requirements backlog. Moreover, every Sprint backlog, based on iterations, will enable us to add the new Ops item:

Wrapping up

So, we’ve got a backlog for the IT Operations team’s members. Then, we’ve related it to their Azure DevOps team. Additionally, we’ve got a particular work item type (not mandatory, but really useful for querying it or adding it into dashboards) target of IT Operations’ job and a dedicated Area Path. We can make many relationships between items of both our backlogs. Here is an example of how an activity can be managed and organized (extension: Work Item Visualize):

As you can see, the Ops items are Successor of the “development” Product backlog items. Indeed, the Ops Items will be finished after the PBI, typically. Think about creating s DNS or a network path to let the production app work in production.

Conclusions

With this solution, we’re decoupling backlogs. Moreover, we’re isolating the management maintaining the relationships between work items that reside on different boards. At the same time, we’re making a strong synergy between Development and Operations.Then, in a couple of clicks, we can switch teams and backlogs, using Azure DevOps Boards. We can track changes in both the departments, also for audit requirements. In my opinion, this helps the enterprise awareness and facilitates the continuous improvement of all the teams and any member’s skill.

DevOps journeys series – Vertica release pipeline with Azure DevOps – Ep. 01 – development (part 2)

Intro

In the previous post we’ve described the idea behind the automation we’re trying to implement on a scenario based on MicroFocus Vertica database.

How it works

This “sandbox” is not a real isolated development workstation. Let’s separate it into two parts, the first one for the development on everything but Vertica (Windows local workstation) and the other one for a Vertica instance (probably Unix/Linux VM) shared between developers.

In this shared instance we will get a schema for each developer is working on the solution, in order to let everyone to get his own “environment”.

The source control folder tree (which will be TFVC source control on-premises) will be designed on the desired branch as the following:

/Project
    /Instance
        /Process1
            /_Master
                schema.ps1 
                tables.ps1
                views.ps1
            /Tables
                Table1.sql
                Table2.sql
            /Views
                View1.sql
                View2.sql
            Schema.sql
        /Process2
            /Tables ...
            /Views ...

As you ca see, under the Project folder there is the Vertica database folder, which contains, schema by schema, all the .sql files for Tables and Views DDLs (CREATE TABLE and CREATE VIEW). You can notice also .ps1 files, which contains the list of executions based on a certain order (business driven).

The file for a, let’s say, “Table1”, can be like this one:

CREATE TABLE :SCHEMA.Table1
(
    RowId int NOT NULL,
    RowStringValue varchar(30) NULL,
    CONSTRAINT PK_<schema>Table1 PRIMARY KEY (RowId)
);

We’ve added a :SCHEMA parameter, which allows each developer to create its own schema as described before. This is the only way we’ve found for isolating developers in a Vertica shared instance, avoiding an instance for each developer, which could be resource intensive for available PCs. Running the application locally, before committing any change set to the Source Control, a simple tool will execute .sql files with the new schema name and in the sort order given by the .ps1 file.

The Tables.ps1 file can be as the following:

param(
[parameter(Mandatory=$true)]$hostname,
[parameter(Mandatory=$true)]$port,
[parameter(Mandatory=$true)]$user,
[parameter(Mandatory=$true)]$psw,
[parameter(Mandatory=$true)]$schemaName,  
[parameter(Mandatory=$true)]$scriptsFolder
)

$schemaCommand = "vsql -h $hostname -p $port -U $user -w $psw -v SCHEMA=$schemaName -f $(Join-Path $scriptsFolder "Table1.sql")"
Invoke-Expression -command '$schemaCommand'

$schemaCommand = "vsql -h $hostname -p $port -U $user -w $psw -v SCHEMA=$schemaName -f $(Join-Path $scriptsFolder "Table2.sql")"
Invoke-Expression -command '$schemaCommand'

You may notice the term “vsql”, which is the command line provided by Vertica for executing queries. Further information here.

Also, usernames and passwords will be stored in an external config file (or a secured API), like the following one:

{
"host": "MyHost.Hos.Ext",
"port": 1234,
"user": "user",
"psw": "password",
"schemaName": "MYSCHEMA"
}

We’ve got the DDLs, the PoSh files for executing them and the Vertica command line. Good, in a development environment, however, a set of tools should be prepared for helping us to keep these artifacts on a single pipeline, too. This is the reason why we’ve created a “builder” script, like  this one:

$config = Get-Content (Join-Path $currentFolder "Build-Config.json") | Out-String | ConvertFrom-Json

$schemaCommand = $(Join-Path $scriptsFolder "Tables.ps1") 
$schemaCommand += " -hostname $($config.host)" 
$schemaCommand += " -user $($config.user)"
$schemaCommand += " -port $($config.port)"
$schemaCommand += " -psw '$($config.psw)'"
$schemaCommand += " -schemaName $($config.schemaName)"
$schemaCommand += " -scriptsFolder $scriptsFolder"

Invoke-Expression -command $schemaCommand

This is another layer of management, which allows us to organize every part of the DDLs to be executed against Vertica.

Note: Our scripts will destroy and rebuild any given SCHEMA. But this is the way we like.

Now, let’s see the possible scenarios.

Start from scratch or get started

When someone wants to start from scratch, this is the pipeline to follow:

  1. get latest version of the branch;
  2. check and change the configuration file (JSON);
  3. execute the create-vertica-database-from-scratch.bat file (it contains our powershell “build” script);
  4. that’s it, we’ve got a new schema in Vertica, empty and ready to be consumed.

If you want to preserve your data, this is not the right path for you. Executing the “builder” tool is optional.

New development

When a developer would make and try its changeset:

  1. change Visual Studio application (SSIS or SSRS here) when needed;
  2. change the Vertica schema (adding tables, columns and so on);
  3. get the .sql file of a new object or change the .sql file of an object which has been updated;
  4. replace them into the TFVC file structure;
  5. change the .ps1/.txt files if any DDL has been added (or if something that impacts on the order occurs);
  6. build the Visual Studio application and try it;
  7. When everything works good, check-in.

Now, everyone can get the latest changes in a CI way.

Get delta changes

When a developer is going to get the latest changes that contains an updated version of the Vertica objects, but wants to preserve its data, this is a little bit more tricky. The person who has made the change could share in a collaborative chat tool the ALTER script. This is not so reliable and comfortable, but without any comparison tool, there isn’t any best way to make this happen.

That being said, we’ve implemented our diff-script generator, based on the analysis of Vertica metadata (the catalog, browsing v_internal objects). So, after our friend gets the latest version, he executes a generate-diff-script.bat tool and lets this script to execute the generated ALTER script. Tricky, but it works like a charm (we will speak about this comparison tool in next posts, maybe) . Anyway, we’re looking forward hearing updates from MicroFocus. Hopefully, we’ll get an official diff tool from them soon!

Conclusions

I’ve just shown the way we’re managing tables DDLs and how we’ve created PowerShell scripts, but the real scenario is more complex. We have to drop Vertica schema (CASCADE DROP) before, then re-creating the new parametrized schema, then tables, then views and so on. Sometimes, we’ve got Vertica schemas which are referenced each other, so we have to create for everyone of them tables before, then views. The business logic is managed by how we write the “build” PowerShell script as well as the automated build process will.

Also the build process is not always “straight”. Some of the business processes need to be managed in a dedicated way. Cross reference will occur but this is the job that the “builder” will do. Both for the manual and the automated one. Moving responsibility to the build process allows us to feel more comfortable about our development solution.

Last, but not least, the manual-development-build process allows the developer to choose between re-create the database or not. They should not waste time in managing the things that a script can do repeatedly and efficiently. This is the reason why we kept somehow static the PowerShell instead of writing complicated business logic. Just adding rows of vsql invocation in the right order, that’s it.

DevOps journeys series – Vertica release pipeline with Azure DevOps – Ep. 01 – development (part 1)

Intro

As a consultant, life could be difficult when it comes to manage platform like Vertica, a columnar RDBMS by MicroFocus. Speaking about DevOps, database management systems like this one neither is well supported by built-in tools nor by any third party suites.

In my experience, which is focused on the Microsoft SQL Server world, tools like the ones made by Redgate or ApexSQL, plays a crucial role when it comes to DevOps. Unfortunately, this time I cannot find any real help. I think that it’s an exciting task, but I’ve to be careful. It’s like “reinventig the wheel” for a car (Vertica) that didn’t realize that it needs wheels. Strong and reliable wheels.

Scenario

In the scenario I’m working on, the data warehouse is managed by a layer of business logic implemented within this platform. Starting from SQL Server database populated by the application layer, the data rows pass through SQL Server Integration Services ETL packages, which transform them onto Vertica repository, and they end into a Business Objects layer (the presentation layer). Just to get the big picture, see the following diagram:

bi-scenario-scenario

Our mission is to share DevOps knowledge, culture and tools in order to automate a set of processes which are managed manually, right now. Not a simple task, even if the guys I’m cooperating with are well-trained and powerful in tech skills. Additionally, they are enthusiast and ready to change (and we know how this is usually a trouble). We will get obstacles only from a technology perspective, actually.

After days of documentation and questions to our MicroFocus contacts, it looks like that Vertica gives us no built-in way or tool for getting an automated process during the phase of the schema comparison. Also third-party tools aren’t that good. We’re trying to dig more and more in order to find out something on the internet. However, everything it’s a “little bit” tricky. To be honest it seems that no one tried to do DevOps with Vertica, even though this is a very good platform for speeding up heavy queries on huge amount of data. Yes, we downloaded a couple of officially suggested tools, whose documentation says that we can compare from and to Vertica itself, but no one fits our scenario. No command lines, no direct integration, no script generation. If you think about automated pipelines, this can be a big problem to deal with. I think that this should be the foundation of a DevOps approach. In the end, it looks like we’re the the first team that is trying to invest efforts into that. It’s funny, though. Hopefully, someone with experience in Vertica DevOps who reads this post could help us!

(After digging more, I’ve found this article that describes almost the same scenario. I hope to reach out the author out).

Prerequisites

As a kick-off, we’ve moved into the prerequisites, starting from the most important thing: make a process that will facilitate the team’s workday, instead of wasting time due to bad choices. This process should be simple and automated.

Then, we’ve argued about the IDE used by developers, evaluating differences between before and after solutions, getting pro and cons of them all. In the end, we agreed on the following solution, development side:

  • Visual Studio 2017 will be the editor for SQL Server Integration services solutions. This team, “BI team” hereafter, is working on SSIS and is separated from the application development team, at least at the moment;
  • TFVC (Azure DevOps on-premises) will be the Version Control System since the BI team is already using it. We will think about a migration path to git then, but for now we’d like to avoid any distraction out of the scope;
  • every get latest from the source control must synchronize all the DDL scripts for Vertica as well as the SQL Server and SSIS solutions, in order to get a sandbox with source code and the local database provisioning scripts (most likely we’ll get a virtual machine with Unix and a Vertica instance, too);
  • each SSIS project must be deployed to the local SQL Server instance when running solutions into the sandbox;
  • when all the SQL Server Integration Services packages are deployed, the list of Vertica DDL must be executed in order to create the database from scratch;
  • Optionally, mock inserts (also from file) could be added to the database in order to get data to work on.

Our idea

As you can see, in this pipeline, we will get everything we need in our sandbox. Just a note, we can choose how to provision the instance of Vertica, in order to scale out resources from local workstations and also use another O.S. It’s up to the team.

A big picture of this process can be summarized as follows:

001

Conclusions

As we’ve seen, the big picture is ready to be implemented and also the team knows perfectly what are the goals. We already know what technologies will be involved and how to keep them all together in order to make our pipeline.

Unfortunately, we cannot find any tool that helps us, so we’re preparing to jot some lines of code down.

DevOpsHeroes 2018 – Another brick in the wall

Event details

DevOpsHeroes has been a great event, again! We didn’t expect so many people and we could not imagine that the feedback would be so good. Quick facts:

  • Subscription: 244 (150 the past year)
  • Attendees: 122 (94 the past year)
  • drop: 50% (38% the past year)

Attendee’s satisfaction

The following radar chart is about the event date, location, quality of the sessions, quality of the speakers, food, hospitality, event design, and kits:

As we can see, the overall satisfaction is really high (4/5)! The blue line is related to the audience which already has attended our event (40%) and the orange one represents the first-timers (60%).

Indeed, we’ve got a good feedback also for the following questions:

  • will you attend again?
    • Sure, 45%
    • Most likely, 33%
    • Likely, 22%
  • will you suggest the event to other people?
    • Sure, 76%
    • Most likely, 21%
    • Likely, 3%

Conclusions

We’re really proud of the third edition of DevOpsHeroes. Engage IT Services and Xebir did a great job together, and, hopefully, both companies will cooperate in the future in order to provide new formats and events like this one. A special thanks goes to Scott Ambler, and also to Italian Agile Moviment for sponsoring and supporting the organisation.

Download sessions here.

Last but not least, thanks to GetLatestVersion.it and also WindowServer.it which allowed us to get DevOpsHeroes in the best shape possible.

See you next year!