DevOps journeys series – Vertica release pipeline with Azure DevOps – Ep. 02 – build

In a previous post, we’ve described the “from scratch” approach on the development side. When everything works well there, a push (or check-in) triggers the build engine. We must deal with two SQL Server instances (SSIS Servers hereafter), with an environment for each of them:

The build pipeline

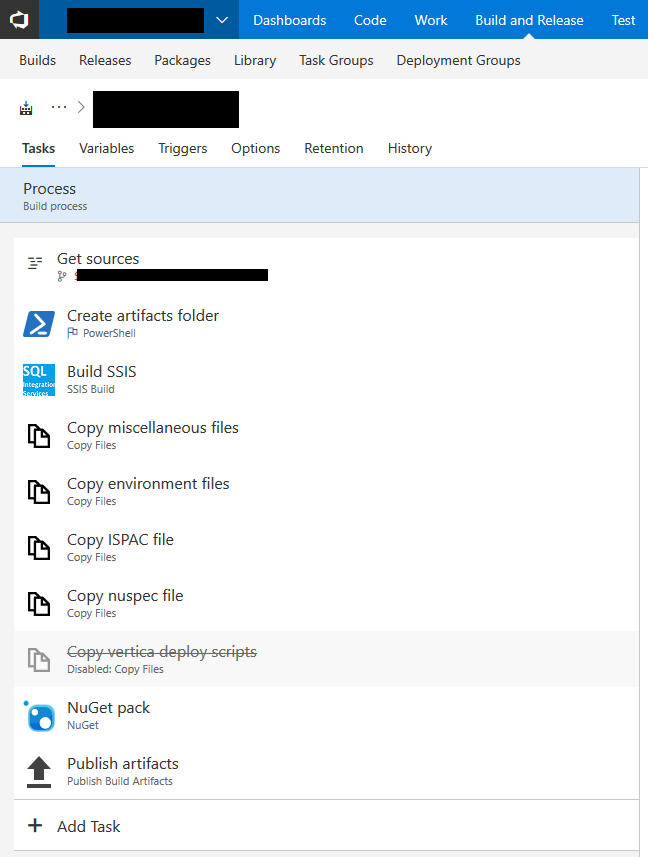
The SSIS Servers keep Vertica‘s test and production mappings as well as test and production connection strings for the SQL Server databases. So we need the right variable mapping for all the scenarios, but this is not in the scope of the post, we will speak about it in the next posts. Anyways, here is how the build pipeline works:

Our build process

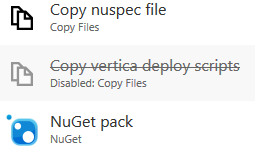
You may notice that the task “Copy vertica deploy scripts” is disabled. Well, to be honest, right now we’re waiting for the target integration environment.

Build process explained

In the beginning, the build server gets the source files from the repository and creates the target artifacts folder with a Powershell script. This will be the path from which we will push the artifacts to the release pipeline.

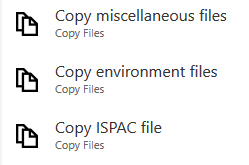
The build server generates the .ispac file for the SQL Server Integration Services packages using the dedicated task. The copy tasks will be executed:

As you can see, we’ve got a set of utilities and transformation tools, that will be executed in the release pipeline as well as the environment script. This one contains the SSISDB variables mapping and the SSIS Project configurations statements. Misc files, .sql files for environments and the .ispac file will be copied to the target artifacts folder.

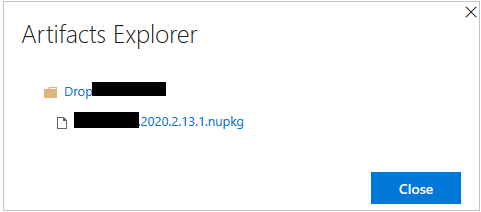
The tasks above copy our template of the .nuspec file to generate the NuGet file (NuGet pack step). This is what we get using NuGet:

Then, we’re ready to publish the files to the release pipeline. We will see how the release pipeline works in the next posts.

Ehm… you miss Vertica

Yes, you’re right. But, it’ll be just a copy of .sql files to the artifacts folder. We will see how the release manager will execute them, so…

Stay tuned!

Display Reporting Services usage statistics with Grafana

Introduction

In this post, we will describe an efficient way of showing the usage statistics of our SQL Server Reporting Services hosted reports. Most of the queries below have been addressed in another article published by Steve Stedman. Even though they are really useful, the article shows their results through SQL Server Management Studio.

The problem

One of the problems that often occur in our organization as well as some of our customers, is to get immediate feedback about usage statistics of reports. Usually, the request of creating reports is out of control and some of them are executed only “that time” and not anymore. In the worst-case scenario, many of them aren’t executed at all and some of them could become even overlapped or duplicated.

Therefore, it is important to know the usage statistics, user by user and report by report, to make the reader aware of them, let him interpreting the values of the same query in multiple ways and graphical layouts. While this is not possible with a tabular format (unless you export the values using any external tools such as Excel) it is simpler when it comes to a dashboard.

Our solution: Grafana

We considered two factors: simplicity and efficiency, in order to make this first-sight dashboard. Grafana enables us to get both of them, as well as being very powerful and immediate. Even though this is not the right definition for it, we can say that “it is a portal to create dashboards using connectors, which support the most famous tools that return data”. We can find them in its marketplace. For instance, tools such as PRTG and Prometheus (monitoring), NewRelic (APM), also SQL and NoSQL data sources are supported:

Obviously, we can find SQL Server. Also, we can contribute to create others, as well as to modify Grafana itself, since it is completely an Open Source project. Examples of possible graphical representations are listed below:

Creating a dashboard is really simple. Just add each panel with a button.

Then, write the query and modify settings to get the desired type of representation.

As mentioned before, the connectors are many. Once selected you can to configure them with parameters:

If you would like to install and configure Grafana you can read the official documentation which also includes a short guide that illustrates how to take your first steps.

That’s it!

Conclusions

With half a day of work (including the setup of the server), we have solved one of the most important problems of our customers, derived from the lack of awareness of reports deployed in production environments. We did it with very little effort and the result, as you can see, is pleasant and effective. Everything is now ready to be published every time we update the dashboards also through a delivery software (Octopus Deploy, Jenkins or Azure DevOps) so all these things fall into the second and third way of DevOps (according to The Phoenix Project): Immediate Feedback and Continuous Improvement.

Stay Tuned!

DevOps journeys series – Vertica release pipeline with Azure DevOps – Ep. 01 – development (part 2)

Intro

In the previous post we’ve described the idea behind the automation we’re trying to implement on a scenario based on MicroFocus Vertica database.

How it works

This “sandbox” is not a real isolated development workstation. Let’s separate it into two parts, the first one for the development on everything but Vertica (Windows local workstation) and the other one for a Vertica instance (probably Unix/Linux VM) shared between developers.

In this shared instance we will get a schema for each developer is working on the solution, in order to let everyone to get his own “environment”.

The source control folder tree (which will be TFVC source control on-premises) will be designed on the desired branch as the following:

/Project
    /Instance
        /Process1
            /_Master
                schema.ps1 
                tables.ps1
                views.ps1
            /Tables
                Table1.sql
                Table2.sql
            /Views
                View1.sql
                View2.sql
            Schema.sql
        /Process2
            /Tables ...
            /Views ...

As you ca see, under the Project folder there is the Vertica database folder, which contains, schema by schema, all the .sql files for Tables and Views DDLs (CREATE TABLE and CREATE VIEW). You can notice also .ps1 files, which contains the list of executions based on a certain order (business driven).

The file for a, let’s say, “Table1”, can be like this one:

CREATE TABLE :SCHEMA.Table1
(
    RowId int NOT NULL,
    RowStringValue varchar(30) NULL,
    CONSTRAINT PK_<schema>Table1 PRIMARY KEY (RowId)
);

We’ve added a :SCHEMA parameter, which allows each developer to create its own schema as described before. This is the only way we’ve found for isolating developers in a Vertica shared instance, avoiding an instance for each developer, which could be resource intensive for available PCs. Running the application locally, before committing any change set to the Source Control, a simple tool will execute .sql files with the new schema name and in the sort order given by the .ps1 file.

The Tables.ps1 file can be as the following:

param(
[parameter(Mandatory=$true)]$hostname,
[parameter(Mandatory=$true)]$port,
[parameter(Mandatory=$true)]$user,
[parameter(Mandatory=$true)]$psw,
[parameter(Mandatory=$true)]$schemaName,  
[parameter(Mandatory=$true)]$scriptsFolder
)

$schemaCommand = "vsql -h $hostname -p $port -U $user -w $psw -v SCHEMA=$schemaName -f $(Join-Path $scriptsFolder "Table1.sql")"
Invoke-Expression -command '$schemaCommand'

$schemaCommand = "vsql -h $hostname -p $port -U $user -w $psw -v SCHEMA=$schemaName -f $(Join-Path $scriptsFolder "Table2.sql")"
Invoke-Expression -command '$schemaCommand'

You may notice the term “vsql”, which is the command line provided by Vertica for executing queries. Further information here.

Also, usernames and passwords will be stored in an external config file (or a secured API), like the following one:

{
"host": "MyHost.Hos.Ext",
"port": 1234,
"user": "user",
"psw": "password",
"schemaName": "MYSCHEMA"
}

We’ve got the DDLs, the PoSh files for executing them and the Vertica command line. Good, in a development environment, however, a set of tools should be prepared for helping us to keep these artifacts on a single pipeline, too. This is the reason why we’ve created a “builder” script, like  this one:

$config = Get-Content (Join-Path $currentFolder "Build-Config.json") | Out-String | ConvertFrom-Json

$schemaCommand = $(Join-Path $scriptsFolder "Tables.ps1") 
$schemaCommand += " -hostname $($config.host)" 
$schemaCommand += " -user $($config.user)"
$schemaCommand += " -port $($config.port)"
$schemaCommand += " -psw '$($config.psw)'"
$schemaCommand += " -schemaName $($config.schemaName)"
$schemaCommand += " -scriptsFolder $scriptsFolder"

Invoke-Expression -command $schemaCommand

This is another layer of management, which allows us to organize every part of the DDLs to be executed against Vertica.

Note: Our scripts will destroy and rebuild any given SCHEMA. But this is the way we like.

Now, let’s see the possible scenarios.

Start from scratch or get started

When someone wants to start from scratch, this is the pipeline to follow:

  1. get latest version of the branch;
  2. check and change the configuration file (JSON);
  3. execute the create-vertica-database-from-scratch.bat file (it contains our powershell “build” script);
  4. that’s it, we’ve got a new schema in Vertica, empty and ready to be consumed.

If you want to preserve your data, this is not the right path for you. Executing the “builder” tool is optional.

New development

When a developer would make and try its changeset:

  1. change Visual Studio application (SSIS or SSRS here) when needed;
  2. change the Vertica schema (adding tables, columns and so on);
  3. get the .sql file of a new object or change the .sql file of an object which has been updated;
  4. replace them into the TFVC file structure;
  5. change the .ps1/.txt files if any DDL has been added (or if something that impacts on the order occurs);
  6. build the Visual Studio application and try it;
  7. When everything works good, check-in.

Now, everyone can get the latest changes in a CI way.

Get delta changes

When a developer is going to get the latest changes that contains an updated version of the Vertica objects, but wants to preserve its data, this is a little bit more tricky. The person who has made the change could share in a collaborative chat tool the ALTER script. This is not so reliable and comfortable, but without any comparison tool, there isn’t any best way to make this happen.

That being said, we’ve implemented our diff-script generator, based on the analysis of Vertica metadata (the catalog, browsing v_internal objects). So, after our friend gets the latest version, he executes a generate-diff-script.bat tool and lets this script to execute the generated ALTER script. Tricky, but it works like a charm (we will speak about this comparison tool in next posts, maybe) . Anyway, we’re looking forward hearing updates from MicroFocus. Hopefully, we’ll get an official diff tool from them soon!

Conclusions

I’ve just shown the way we’re managing tables DDLs and how we’ve created PowerShell scripts, but the real scenario is more complex. We have to drop Vertica schema (CASCADE DROP) before, then re-creating the new parametrized schema, then tables, then views and so on. Sometimes, we’ve got Vertica schemas which are referenced each other, so we have to create for everyone of them tables before, then views. The business logic is managed by how we write the “build” PowerShell script as well as the automated build process will.

Also the build process is not always “straight”. Some of the business processes need to be managed in a dedicated way. Cross reference will occur but this is the job that the “builder” will do. Both for the manual and the automated one. Moving responsibility to the build process allows us to feel more comfortable about our development solution.

Last, but not least, the manual-development-build process allows the developer to choose between re-create the database or not. They should not waste time in managing the things that a script can do repeatedly and efficiently. This is the reason why we kept somehow static the PowerShell instead of writing complicated business logic. Just adding rows of vsql invocation in the right order, that’s it.

DevOpsHeroes 2018 – Another brick in the wall

Event details

DevOpsHeroes has been a great event, again! We didn’t expect so many people and we could not imagine that the feedback would be so good. Quick facts:

  • Subscription: 244 (150 the past year)
  • Attendees: 122 (94 the past year)
  • drop: 50% (38% the past year)

Attendee’s satisfaction

The following radar chart is about the event date, location, quality of the sessions, quality of the speakers, food, hospitality, event design, and kits:

As we can see, the overall satisfaction is really high (4/5)! The blue line is related to the audience which already has attended our event (40%) and the orange one represents the first-timers (60%).

Indeed, we’ve got a good feedback also for the following questions:

  • will you attend again?
    • Sure, 45%
    • Most likely, 33%
    • Likely, 22%
  • will you suggest the event to other people?
    • Sure, 76%
    • Most likely, 21%
    • Likely, 3%

Conclusions

We’re really proud of the third edition of DevOpsHeroes. Engage IT Services and Xebir did a great job together, and, hopefully, both companies will cooperate in the future in order to provide new formats and events like this one. A special thanks goes to Scott Ambler, and also to Italian Agile Moviment for sponsoring and supporting the organisation.

Download sessions here.

Last but not least, thanks to GetLatestVersion.it and also WindowServer.it which allowed us to get DevOpsHeroes in the best shape possible.

See you next year!

Posting SQL Server notifications to Slack

Introduction

Automation, proactive monitoring, repeatability, reducing waste of time and technical debt. This is something you should know about when trying to do some DevOps.

Why automation? Because you can reduce technical debt and the number of failures that can happen with a manual interaction. You can create environments using a provisioning procedure without falling in common pitfalls like security misconfigurations, wrong configurations and botched monitoring.

Talking about SQL Server, immediate and proactive notifications represent a great step forward toward automation.

We automate whenever we want to stop doing a bunch of recurring or tedious steps manually. At the same time, we are also improving the overall quality and we are reducing the amount of things that can (and will) go wrong.

We are also optimising on how we use our time, because we can just ignore what the automation is doing for us and focus on that something that really needs our attention.

Finally, in this modern and notification-based world, emails generate too much white noise to deal with. In this article, we will learn how to integrate SQL Server tasks’ notifications with one of the most used collaboration tools: Slack.

Keep in mind that this is not the only way to get this done. This guide would help you to better understand why we’re doing this (eventually why DevOps), and not strictly how to do it, even if we’ll see a real working example.

Minimal requirements

You need to setup an account on slack.com (on a paid plan) and a SQL Server edition. I recommend the free developer edition here.

Note: Don’t use SQL Server Express edition. This version doesn’t support any SQL Server Agent task as well as the Database Mail, which we’ll need hereafter. Also, about slack, you must create a paid account, because the integration described below will not work with a free profile.

In order to send emails, we will use an SMTP sever. It can be either a private Microsoft Exchange, PostFix, or any other on-premises solutions, together with a cloud delivery service, like SendGrid, SendInBlue, MailJet, or Office 365.

The scenario

In a team like mine, which uses chat as a daily communication driver, centralizing every business and technical message could be a great step forward for the members of the team in terms of awareness and knowledge sharing. Business roles can use that tool as well, so we can chat to each other switching topics between tech and functional discussions. It’s just a matter of how Slack (in our case) is configured with channels and naming conventions. A good setup helps us to better organize our meetings, small talks and any other topic related to implementations. This is a cool argument to speak about, but a little bit out of the scope of this guide. We will focus on notification bots instead.

SQL Server is able to send emails with its built-in features out-of-the-box, but we’d like to centralize every notification inside Slack, gaining the following advantages:

  • Instant notification
  • Tailored focus (custom sound instead the same popup for all the incoming emails)
  • Opt-out
  • Quickly involve people that are not following the channel by a mention
  • Relay the problem description within the chat
  • Take actions as soon as the notification is received

The proposed solution

Now, how can we send notifications from SQL Server in an easier way than using custom code or a Slack incoming webhook? Is there any integration or a Slack app?  Yes. And guess what? I think you’ll like it because you don’t need to write a single line of code, and you don’t need to choose between CLR, PowerShell or any other language. It’s ironic, but the integration is called “Email”.

Slack

The purpose of this article is just to describe Slack as a collaboration tool. Further details are provided here. As we said before, the following samples work only if you get a Slack account.

The Slack Email integration

This is the app to work with: Email. Its configuration is based on a four-step wizard:

  • Select the channel (or create a new one).

001.png

  • When added, set the name and a short description of the new contact (bot) in Slack.

002.png

  • Change the avatar (it’s important to recognize the bot at a glance)

003

  • After saving, copy the email address the app created for you.

004

A word about the “Hide this address” checkbox: this is useful if you want to hide the address to any other member of your workspace. You will be the only user able to read it if you check that box.

Type of SQL Server notifications and setup

As a DBA, we’re managing the following types of notifications on a daily basis:

  • SQL Server built-in and custom Alerts
  • Job execution status
  • Integration Services custom emails (within the packages)
  • External monitoring tools (which monitor SQL Instances)

With the exception of SSIS custom emails and external monitoring tools, everything is managed by Database Mail. This is a lightweight layer that allows us to send emails directly from a SQL Server Instance, connecting to a SMTP server.

To setup Database Mail you can follow this guide from Microsoft Documentation.

Once this is up and running, you can manage the notifications using SQL Server Operators. An operator is an alias managed by the SQL Server Agent which you can use to send emails and other types of messages, like pagers and Net Send.

Creating an operator is simple, just invoke the following system stored procedure:

USE msdb; 
GO 

EXEC dbo.sp_add_operator 
    @name = N'<name here>',
    @enabled = 1,
    @email_address = N'<email here>';
GO

If you’re asking what email address you should use, it’s easy to say. You must fill the @email_address parameter with the address returned by the Email app integration for the channel you will send to (j8e4b5t2p4y8g4o2@elysteam.slack.com in the example above). But, what about the name parameter? In my opinion, the best name is the one that helps us to understand where the message will be sent to. Suppose that we’d like to notify something about some index maintenance jobs. We could call the operator Slack Indexes Maintenance, Slack Indexes Maintenance Operator and so on. With such names, you will immediately know what we are going to send to Slack as the topic is related to index maintenance.

Thus, you’ll get the following snippet:

USE msdb; 
GO 

EXEC dbo.sp_add_operator 
    @name = N' Slack Indexes Maintenance Operator',
    @enabled = 1,
    @email_address = N'j8e4b5t2p4y8g4o2@elysteam.slack.com';
GO


Slack channels naming considerations

I’d like to share with you my thought about the channel naming conventions. The principles to follow when naming channels, are:

  • Readability (clear for everyone)
  • Awareness (know what)
  • Style and Rules (know how)
  • Repeatability (keep using it from now on)

That being said, if the channel name describes a single action (like indexes maintenance in the above example) the operator which will send notifications should be unique. The reason is simple enough: we know that Indexes Maintenance Operator is sending messages to #sql-idx-maint-alerts (readability) and everyone knows that this is a one-to-one communication between a SQL Server Operator and Slack (awareness). Everyone knows that the “sql” channel prefix indicates SQL Server-related notification and the “alerts” suffix indicates that is an issue to pay attention to (style and rules). At the same time, everyone knows how to do the same with another pipeline of messages in the future (repeatability).

On the other hand, using a general purposes channel, like #sql-maint-alerts, allows us to be ready to future changes. Suppose that index maintenance will not be the only operation we’re executing in our servers (and typically isn’t). Does it make sense to create a new operator called for example, Database Concurrency Check Operator, which sends to a specific purpose channel? Clearly not.

In the end, a generic purpose channel gives the opportunity to hold more than one topic. All the notification sent to that channel should be, let’s say, of the same category to avoid too much generalization.

These solutions (one channel for more operators or a one-to-one solution) work equally well, it’s just a matter of how you’re designing your Slack channels. I suggest to avoid the “one channel to rule them all” pattern, because you’ll get thousands of mixed notifications without any clear idea behind them. After all, a noisy channel with messy content is something that will not be considered for a long time and will be eventually dropped.

Binding alerts

Alerts are triggers that communicate to an operator that something went wrong. This Brent Ozar’s article offers a good list of alerts that need attention. Here you can find their descriptions, based on severity. The binding is straightforward. All you need to do is to link the operator to the alert:

005006

When one of those events occur, an operator is alerted. Then, it sends the message using its setup – in our scenario, an email. If the operator uses the Slack Email app, the email will be sent to the Email app, and the integration will redirect it to Slack.


Binding job execution statuses

Let’s see how we can use the notification mechanism to monitor SQL Server Agent Jobs. Each job lets you configure what to do in case of failure, success or completion of its execution. The binding is similar to the alert’s one:

007.png

Once the result is collected, based on the configurations you’ve set up, this job will send an email to the app.


Binding custom Integration services email

In order to send an email from a SQL Server Integration Services package (aka .dtsx) you need to configure the SMTP server within the package itself. This is a little out of scope, because it’s not really a SQL Server notification. You can leverage the power of SSIS and prepare a rich HTML-formatted message; the result is nice to read and informative like in these examples:


Cool stuff, isn’t it? It’s simply a .NET script in SSIS, which uses the System.Net namespace. Although the SSIS package is executed within a SQL Server Agent job, the default notification message that SQL generates is not easy to read. The message you always get is:

JOB RUN:<name> was run on <date/time> DURATION: x hours, y minutes, z seconds. STATUS: Failed. MESSAGES: The job failed. The Job was invoked by Schedule xyz (<name>). The last step to run was step xyz (<name>)

Decorating the package with a more detailed email will improve the readability and the accuracy of our notifications.

Setup an external monitor for notifications to Slack

SQL Server is often (hopefully) monitored with specific counters. We’re using PRTG monitoring tool to measure them, and when a baseline changes and a threshold is hit, we send notifications to Slack. How? Again, sending to the Email app integration, specifying the right channel to send to and getting this:

010.png

The above report has been truncated. In a complete version of it, you’ll find the complete details of the measures, like the name of the servers, the sensors links, the grid with all the results, and everything you can see inside a PRTG admin portal.


Test

Let’s see a more complete example, using a SQL Server alert. We’ll use the Severity 17 alert. Severity 17 is simple to raise and it describes a missing or insufficient resource when executing a command:

USE msdb; 
GO 

EXEC msdb.dbo.sp_add_alert @name=N'Severity 017',
    @message_id=0,
    @severity=17,
    @enabled=1,
    @delay_between_responses=60,
    @include_event_description_in=1,
    @job_id=N'00000000-0000-0000-0000-000000000000';
GO

Set the Response for the Severity 17 alert to “Notify Operator”, via email:

006

Run the following severity 17 based t-sql script:

RAISERROR(N'An error occurred Severity 17:insufficient resources!', 17, 1) 
WITH LOG; --don’t forget to use WITH LOG
GO

Go to your Slack account. If you’ve configured everything correctly, you should see the following:

011.png

Did it work? Great! If not, continue reading.


Troubleshooting

If you don’t see the notification try these steps:

  1. Be sure that your Slack account is confirmed (its email too)
  2. Once the Slack account is confirmed, check if the channel still exists (CTRL+K -> name of the channel)
  3. Click on “Customize Slack” in the drop down menu of your Slack client/webpage, then click on Customize App in order to check whether the Email integration is active or not:

012

013.png

  • Verify Database Mail configuration (try to send the test email)
  • Verify the operator configuration (is it enabled?)
  • Verify the alert configuration (did you bind the response with email to the operator? Is it enabled?)
  • Verify the SQL Server Agent email profile configuration (is it enabled? Is it the right one?)

014

Conclusions

There are some disadvantages when using this kind of integration. For example, you cannot customize the message, unless you do it inside a .NET script. The Slack Email Address is publicly available, albeit hard to discover, so anyone can send message to your private slack channel by sending emails to that special address. Again, you cannot send the notification to more than one Slack channel or outside of the Slack world. In reality native SQL email notifications show the same limits, where email addresses of distribution lists are similar to Slack channels.

For our purposes, this is a very-low-effort automation with a high return in terms of value. With a couple of clicks, you can setup an email address representing a Slack channel, and, with little more, you can get notifications in a smart and comprehensive layout.

Everything is kept inside the collaboration chat tool we are using massively, every day. In the end, this example embeds one of the core DevOps principles (automation) and provides huge cross-role and cross-team value, especially when the channels include also network and server teams.

I hope that you’ll give this a try.

DevOpsHeroes see you next year!

Event details

DevOpsHeroes has been a great event. We didn’t expect so many people and we could not imagine that the feedback would be so good. Quick facts:

  • Subscription: 150
  • Attendees: 93
  • drop: 38%

Attendees’ County/Region (breakdown):

partecipanti-geografia.png

Attendee’s satisfaction

The following radar chart is about the event date, location, quality of the sessions, quality of the speakers, food, hospitality, event design and kits:

soddisfazione

As we can see, the overall satisfaction is really high (4/5) and everything on the venue was rated higher!

Indeed, we’ve received a good feedback also for the following questions:

  • will you attend again?
    • Sure, 26%
    • Most likely, 52%
    • Likely, 20%
  • will you suggest the event to other people?
    • Sure, 59%
    • Most likely, 32%
    • Likely, 9%

Additionally, we’ve got 87% of new entries, awesome!

Some considerations

We have to work for the next year’s edition, in order to improve our organisation, but in the end we did very good. The number of event feedback is close to the total number of attendees, so they can be considered the source of any suggestion.

Speaking about tech sessions, including the speech made by Martin Woodward, we’ve received a set of important suggestions. We already know, our speakers are skilled and passionated, but how can we understand the people’s opinions without these surveys?

I’ve spent last two nights in browsing and reading hundreds of those sheets (almost 500, thanks again). Each of them has the following questions:

  • Did the session meet your expectations?
  • Was the topic interesting?
  • Was the speech valuable?
  • What about the quality of the presentation?
  • How’s the speaker? Funny, expert, teacher, motivator, storyteller?

As we can see in the picture below, left side, the overall satisfaction is very high once again (expectations, interesting, valuable and presentation). On the right side, we notice that our speakers are considered experts and somehow funny and storyteller:

screen-shot-2017-10-28-at-02-07-53-e1509149570123.png

Conclusions

We’re really proud of the second edition of DevOpsHeroes. Engage IT Services and Upgrade did a great job together, and, hopefully, both companies will cooperate in the future in order to provide new formats and events like this one. A special thanks goes to Martin Woodward (Microsoft), which “crossed the seven seas” for being with us, and also to HPE for sponsoring and supporting the organisation. A great kudos goes to Silvio Di Benedetto and Giuliano Latini, who managed and followed the live streaming and the session recordings (coming soon here).

Download sessions, pics and the event stuff here.

Last but not least, thanks to GetLatestVersion.it, DotDotNet.org and also WindowServer.it which allowed us to get DevOpsHeroes in the best shape possible.

See you next year!

Events: DevOpsHeroes 2017 and SQL Saturday Parma 2017

It’s September, a month whose the start is the beginning of many things, especially in Italy. Kids start over the schools, Companies invest, and what about projects and events?

You know, I really love to do both. But in this post I’d let you know how I feel proud about my work in the past four years. Thanks to the help of my employees and co-ops, I did organise four SQL Saturdays in Parma (2014/355, 2015/462 and 2016/566), making our small town a big SQL Server City. Who would’ve thought it? Yes, maybe in my mind, there was something that pushed me to try, but it could have an epic fail. However, I did it, and it was an astonishing set of records. It started as a quest in an Role Play game, and now we’re in front of this great SQL Saturday. Something to be really proud of.

Two years ago, I felt the need to add a new event, which would have to support a new way of thinking about the IT roles that I was aware of. And that was when DevOps came out. A new buzzword that needed to get a deep explanation, in terms of culture and approach. Combining my passion to The Simpsons series (especially considering Homer Simpson) and DevOps stuff, I’ve made up DevOpsHeroes, whose acronym is DOH, the Homer’s exclamation. And now, for the second year, Developers, IT Operations people, DBAs and PMOs will share their experience about how to integrate, cooperate and make IT world more productive. Another event, another thing to be proud of.

DOH_logo

After the introduction, let me give you some important details about these events, sorted by upcoming date:

DevOpsHeroes 2017 – Parma (http://www.devops-heroes.net/)

Sql Saturday 2017 – Parma (http://www.sqlsaturday.com/675)

  • Date and Location: Saturday, 18th November @ Univeristy of Parma
  • Hashtag: #SQLSAT675
  • Entrance fee: free (lunch included)
  • Duration: from 8am (registrations until 9am) to 6.30pm
  • Registration link: https://www.sqlsaturday.com/675/registernow.aspx
  • At the registration desk:
    • you will use the SpeedPASS
    • you will receive the lunch ticket
    • you will receive the welcome kit
  • session languages: ITA/ENG

However, this year I’d to thank my helpers at Engage IT Services Srl,  the great support of Upgrade Srl (Andrea, Federica and Riccardo, that organised with us the DOH event), HPE and also many communities, like DotDotNet.org and mostly our great community GetLatestVersion.it. A special thanks goes to Windowserver.it, which will record sessions, live streaming and interviews. Speaking about SQLSaturday, the sponsor page depicts how the event is supported. A big thank goes to all of them!

What the future will reserve to us in Parma? I think that I could try to add another event, maybe on IoT topics, because I feel that the world will change following that direction and also, hopefully, my newborn Giulio will play with my and some robot 🙂

Alternatives could be changing the format, like with a TED event or something like it. Who knows? I’m pretty sure that I’ll get a lot of help from now on. This year has been a demonstration of it. I started alone, and now we work in five. The last thing to be proud of. Wonderful!

Automatically link databases to Red Gate SQL Source Control

For the ones that have many databases to keep under source control, it can be really useful to speed up the link-to-source-control process. The only way we have now is to use the GUI provided by Red Gate SQL Source Control. Actually, there’s a github project called SOCAutoLinkDatabases by Matthew Flat, a Red Gate engineer, but, unfortunately it works only on a shared database model (centralised) in TFS. Let’s see how to manage the link using Working Folder (which is also good for many SCM) and dedicated database model (distributed).

Continue reading “Automatically link databases to Red Gate SQL Source Control”

Agile@School – A new way for managing school projects

Last Saturday, I’ve shown the Agile@School project at ITSOS Fornovo Taro, the school in which I’ve studied for five years, just before starting to work as a junior developer.

ITSOS has been (and this is true right now) at the forefront of computer technology and now, thanks to the new “technology course”, the project becomes really interesting. During the year, indeed, the teachers have spoken about development methodologies, both for Agile and Waterfall approaches. This sounds great, especially in Italy.

Continue reading “Agile@School – A new way for managing school projects”