Serie completa: Agile@School 2020

Eccovi la lista degli episodi, per condividere con voi il progresso di quest’anno con l’IISS Gadda di Fornovo Taro (TAG# Agile@School):

Anche quest’anno grandissima esperienza. Un grazie a Christian Memoli (docente di Tecnologia) e al nostro istruttore Pier-Paolo Mammi, che ha fatto veramente un bel lavoro.

Strumenti utilizzati: Azure DevOps services, Microsoft Teams, GitHub.

Alla prossima!

Agile@School – Anno quinto, ep. 8

Siamo infine giunti al termine della nostra avventura “agile” coi ragazzi del I.I.S.S. Gadda; è stato un viaggio pieno di concetti nuovi, di abitudini per lo più sconosciute e difficili da fare proprie, soprattutto in un percorso così breve. Cosa avranno imparato i ragazzi e cosa sarà rimasto loro per il futuro? Intanto, scopriamo com’è andata la presentazione dei progetti.

Esaminare il file README e le grafiche delle applicazioni

Nella precedente lezione Pier-Paolo ha dato un paio di esercizi: compilare il README.md dei progetti GitHub, visualizzato in automatico all’apertura del repository da browser e realizzare alcuni mock-up dell’interfaccia grafica per le applicazioni che hanno sviluppato finora. Eravamo curiosi di capire come i ragazzi si sarebbero immaginati la propria applicazione, così come quale sarebbe stata la loro “sensibilità” verso la user experience.

Già dalle diverse modalità con cui i progetti sono stati presentati abbiamo notato con piacere il buon livello di organizzazione e affiatamento dei team. In particolar modo ci ha colpito il team TEP, che non solo ha realizzato un file readme corposo, con una descrizione estesa delle funzionalità dell’applicazione e istruzioni piuttosto dettagliate per l’apertura in locale del loro progetto, ma anche ricco di linee guida da seguire per la creazione della parte grafica, con i colori dell’applicazione, gli stili, ecc.

Le diverse schermate sono poi state descritte dai rispettivi creatori, tuttavia risulta evidente la coerenza generale con cui queste sono state ideate. Nonostante la grafica fosse minimale (com’è giusto che sia in un mock-up), questa risultava di immediata comprensione e fruibilità da parte di un possibile utente finale, per cui sarebbe stata tranquillamente impiegabile in una app reale.

Durante la visione del codice è risaltato il corretto utilizzo del branching negli sviluppi (affrontato in prcedenza) portati avanti dai vari membri.

Il secondo gruppo a dare soddisfazione è stato quello che ha progettato il Casinò. File readme ben compilato, è vero, ma degno di nota è stato soprattutto il mock-up della loro applicazione: una sola schermata, ma molto vicina ad una vera pagina iniziale di un sito di gaming, poiché costruita con molto colore e con tanta grafica. Non solo, anche funzionante!

Gli altri due gruppi sono riusciti a realizzare dei mock-up significativi, ma con qualche “pecca”: quello presentato dal team CUP, impaginato bene ma troppo simile a un sito vero e proprio, tanto era ricco di contenuti. Non è stata sottolineata la modalità di utilizzo dell’applicazione. I ragazzi del team ClasseViva sono stati più “in tema”, ma le schermate presentavano qualche incertezza a livello di esperienza utente. Pier-Paolo ha quindi suggerito di scegliere i componenti dell’interfaccia in modo da renderla più intuitiva e immediata per l’utente finale (ad esempio, prediligere i pulsanti invece delle tendine di selezione e via discorrendo).

Tirando le somme

In queste otto lezioni abbiamo parlato di come ci si approccia allo sviluppo “agile”: cosa sono le user story e come queste diventano work item in un sistema di gestione dei progetti (in particolare Azure DevOps); cosa sono le boards, come si utilizza il backlog e la presa in carico dei task; infine, come sia importante abituarsi alle cosiddette cerimonie (stima dei work item, review quotidiana, etc.). Abbiamo poi complicato il tutto coinvolgendo Git e le sue caratteristiche più avanzate, come ad esempio il branching e la risoluzione dei conflitti, nonché la necessità di collegare la gestione del codice ai work item per tracciare contemporaneamente gli sviluppi e l’andamento del progetto. Infine abbiamo condito il tutto con qualche concetto normalmente tralasciato quando si parla di sviluppo, come la creazione della documentazione (tecnica e funzionale) e la realizzazione di mock-up per la UI.

Conclusioni

A ben guardare, anche se per me il tempo è quasi volato, abbiamo fatte vedere davvero tante cose a questi giovani. Confidiamo che per gli studenti il corso (seppure il nome è riduttivo vista l’esperienza) non sia stato semplicemente uno fra tanti, ma che sia visto come un punto di partenza, uno stimolo in più per approfondire e fare propri tutti i concetti, soprattutto per quando si troveranno ad affrontare un’esperienza lavorativa. In più, la difficoltà imprevista della quarantena (a nostro avviso, affrontata alla grande) ci ha “costretti” a condurre il corso in modalità online. Beh, possiamo ritenerci decisamente soddisfatti.

Chiudo (un po’ a malincuore) ringraziando in primis il professor Christian Memoli e i dirigenti dell’I.I.S.S. Gadda, che ci hanno nuovamente dato fiducia nel portare avanti il progetto Agile@School; naturalmente i ringraziamenti si estendono, al nostro docente ormai ufficiale, Pier-Paolo, che ha svolto un lavoro eccellente, di cui ero praticamente certo.

Last, but not least non posso che ringraziare anche i ragazzi stessi, sia per aver sopportato le nostre pressioni, sia per aver ascoltato e messo a frutto quanto imparato: senza di loro questo progetto non avrebbe neanche senso di esistere!

Stay tuned per il prossimo anno…

Agile@School – anno quinto, ep. 6

Siamo arrivati al sesto incontro con i ragazzi. La quarantena non ci lascia tregua ma noi siamo più tenaci e non molliamo di certo! Ormai l’incontro su Microsoft Teams è consolidato e sarà il fatto che è ora di colazione o che ci troviamo tutti “insieme” ma a casa, insomma, ci si sente quasi in famiglia.

Ma bando alle ciance, perché oggi tocca al branching su Git, pratica molto utile e consigliata nell’utilizzo quotidiano, ma allo stesso tempo complessa e insidiosa.

[…] il branching risulta essenziale per poter testare l’efficienza di implementazioni differenti o per realizzare dei proof-of-concept in corso d’opera.

Chi sviluppa conosce bene il tema, essendo vita di tutti i giorni. Tuttavia, in certi frangenti, è necessario chiedere aiuto alla documentazione o a chi può esserci di aiuto. Per questo motivo Pier-Paolo, con tanta pazienza, ha preferito mantenere un livello di applicazione piuttosto semplice, portando esempi pratici tratti dalla nostra esperienza lavorativa aziendale, per meglio dimostrare ai ragazzi la reale utilità di questo strumento.

Il branching, il nostro miglior alleato

I vantaggi del branching non si limitano al fatto di poter sviluppare funzionalità differenti in parallelo o da sviluppatori differenti. Infatti, risulta essenziale per poter testare l’efficienza di implementazioni differenti o per realizzare dei proof-of-concept in corso d’opera. Pier-Paolo ha inoltre evidenziato l’eventualità, in realtà fin troppo frequente, del verificarsi di conflitti nel codice al momento del merge dei vari branch su quello principale di sviluppo. E cosa ha deciso di far provare ai ragazzi?

The “git flow” branching model
gitflow, esempio di branching su git

Reazioni dei ragazzi ai primi conflitti

Il caso più semplice che abbiamo sottoposto ai ragazzi si verifica quando due o più sviluppatori modificano il medesimo file in punti differenti. Ma siamo arrivati al caso più critico, quello di un file modificato nello stesso punto. Abbiamo seguito insieme i passi necessari per risolvere i conflitti tramite SmartGit e la condivisione dello schermo (vedi smart learning).

La lezione è stata davvero impegnativa, ma i ragazzi sembrano aver seguito con attenzione e compreso bene, reagendo con prontezza grazie anche alle indicazioni degli strumenti ai quali sono abituati.

Durante la prossima lezione vedremo molto probabilmente qualche risultato tangibile in termini di prodotto. Di certo parleremo di documentazione funzionale destinata all’utente finale, aspetto spesso tralasciato in favore della realizzazione tecnica del software.

Continuate a seguirci, l’esperimento delle lezioni online sta procedendo a gonfie vele e ormai manca poco a vederne i risultati finali.

Stay Tuned!

Agile@School – Anno quinto, il progetto in remoto

Si sente spesso dire che la scuola non ha tutti gli strumenti per poter fronteggiare formazione in remoto. In generale, il mondo della formazione scolastica è considerato talvolta un po’ arretrato. In realtà, l’istituto che stiamo seguendo, sia con progetti paralleli, sia come alternanza scuola-lavoro è ed è sempre stata all’avanguardia. Forse sono un po’ di parte, visto che si tratta della scuola in cui ho studiato, ma credo che meriti una degna menzione.

Ancor prima che io potessi contattare i professori per tentare il progetto in remoto, ho ricevuto una telefonata dal professor Christian Memoli che, riassumendo, chiedeva: “abbiamo tutto per fare da remoto, abbiamo Teams, abbiamo strumenti di video conferenza, è un problema per la tua azienda? Noi stiamo già facendo didattica a distanza.”. Che cosa posso dire? Prima di tutto, che l’IISS Gadda di Fornovo Taro è pronto, veramente. Poi, nel mondo del lavoro di cui noi informatici siamo parte, non spesso il telelavoro è ben visto, mentre una scuola dimostra un sentimento responsabile e proattivo.

Attenzione, non fraintendetemi, per la nostra azienda, TUTTI e sottolineo TUTTI i clienti e i fornitori hanno condiviso, chiesto e supportato il lavoro da remoto. Però conosco casi in cui, seppure possibile come strada da percorrere, il telelavoro non è ancora ben visto. Per fortuna la nostra realtà aziendale non ha questo tipo di conflitto, anzi! Consapevolezza e responsabilità vanno per la maggiore, unitamente al rispetto per la salute di tutti.

A partire da mercoledì, seguiremo una serie di incontri (purtroppo ancora fino a data da destinarsi) utilizzando Microsoft Teams (strumento già utilizzato dalla scuola regolarmente), connettendosi in Azure DevOps Services e sfruttando GitHub come già indicato nei post precedenti della serie. Il tutto da remoto! Sento che questo progetto, già interessante, non farà altro che diventarlo ancora di più. Dimostreremo le possibilità dell’informatica, terremo comunque i ragazzi interessati e chiuderemo il progetto, senza farci fermare dallo spazio fisico.

Non vedo l’ora, stay tuned!

Agile@School – Anno quinto, ep. 3

Nella seconda lezione abbiamo deciso di iniziare ad affrontare l’integrazione fra Git e Azure DevOps, in particolare per quanto riguarda il collegamento automatico fra i commit/push e i Task. Questa volta, però, abbiamo incontrato non poche difficoltà. I ragazzi, infatti, hanno lavorato su GitHub fino ad oggi, per cui abbiamo ritenuto opportuno effettuare l’importazione dei loro repository sul nostro Azure DevOps, tramite l’apposita funzione integrata.

Agli studenti, comprensibilmente, non erano stati dati permessi sufficienti per effettuare l’importazione in autonomia, per cui un po’ di tempo è andato perso nel far immettere le loro credenziali, uno alla volta. Superato “facilmente” questo primo ostacolo, i repository sono risultati importati con successo e, dopo una prima revisione dei concetti base di source control e del funzionamento di Git, Pier-Paolo ha seguito i ragazzi nell’operazione di cloning con l’ausilio di SmartGit, a cui erano già da tempo abituati.

log-default-coloring-4f58b1c4.png (1596×792)

Si è partiti con i comandi base di Git (checkout, commit, push/pull) intervenendo direttamente sul codice già scritto dai ragazzi, su schermo condiviso, in modo da dimostrare loro le potenzialità dello strumento. Purtroppo, la condivisione su schermo è stata l’unica strada percorribile, anche in questo caso i permessi erano mancanti. Dobbiamo preparare gli ambienti un po’ meglio la prossima volta!

Altra cosa da notare questa volta è che, durante la lezione, abbiamo avuto modo di toccare, seppure superficialmente, questioni di metodologia di sviluppo. Ad esempio abbiamo affrontato le naming convention, modularità e pulizia del codice, leggibilità, e via discorrendo, tutti argomenti che usualmente non vengono trattati nei classici corso di programmazione.

A fronte di tutte queste problematiche introdotte dal tentativo di migrare i progetti su Azure DevOps, è parso evidente che i ragazzi trarranno più benefici continuando ad utilizzare i loro repository su GitHub. Pier-Paolo si è quindi prefissato di sfruttare la funzionalità “GitHub Connections” la prossima volta. La feature di Azure DevOps permette di collegare un repository GitHub ad un progetto interno, permettendo al tempo stesso di sfruttare il meccanismo di associazione fra commit e Task, come descritto qui.

Kanban board shows GitHub links

Stavolta la lezione è stata forse più importante per noi che per i ragazzi e in retrospettiva individuale abbiamo imparato una importante lezione:

L’utilizzo di strumenti già in essere (non ci stancheremo mai di ripeterlo) è fondamentale per non aggiungere ostacoli ad un già difficoltoso percorso di migrazione culturale. Da queste piccole cose, si denota come una consapevolezza dell’ambiente in cui si lavora e dei tool annessi, avvicini tutti al successo del progetto stesso. E questo vale sia nelle aziende, sia nelle scuole.

La prossima volta tocca al branching e a comandi Git più “avanzati”, come le pull request, e il livello di difficoltà aumenterà notevolmente… Vediamo come sapranno affrontarla!

Agile@School – Anno quinto, ep. 2

Eccoci arrivati alla seconda lezione, cominciamo finalmente a fare sul serio!

La volta scorsa avevamo chiesto ai ragazzi di provare a inserire le user story sulle board dei loro progetti. Ora, le board erano lande desolate… Forse la causa è da attribuire al concetto di user story, che può essere in qualche modo complesso e non facile da “digerire”. Oppure il motivo è da ricercare in una gita in Spagna di mezzo?

Nessun problema, è comprensibile che le user story non siano di immediata comprensione, soprattutto per questi ragazzi che sono chiamati ad essere clienti, PO e sviluppatori nello stesso tempo. Soprattutto un portale con così tante feature, non è semplice da navigare, per cui, armati di pazienza, Pier-Paolo ha ripreso i concetti daccapo e li ha approfonditi con esempi concreti.

Questa volta, invertendo di fatto il modus operandi della lezione precedente, ha provato a dare molta più importanza alla pratica, quindi, insieme ai docenti ha seguito i ragazzi nel data entry sulle board.

I gruppi avevano già compilato a inizio corso un elenco di attività da eseguire per sviluppare i loro software: chi salvato su un foglio Excel condiviso sul cloud, ben formattato (soprattutto i gruppi con ragazze, sempre precise), chi invece su un file di testo, copiato per ogni studente, aggiornato via email (questo invece sarà un buon punto di partenza per una delle prossime lezioni, ndr). I ragazzi sono comunque stati veloci ad apprendere e, dopo un primo approccio, hanno iniziato anche ad appassionarsi. Si è vista la crescente curiosità rivola a come si gestiscono gli item e a come dovrebbero essere compilati. Sta crescendo la loro parte proattiva, nulla di più bello da vedere in una classe.

Per terminare rilassandosi un po’, Pier-Paolo ha insegnato poi il poker!

Non quello vero, naturalmente, anche se uno dei progetti è un Casinò virtuale, ma il planning poker. E qui proprio il gruppo che sviluppa il Casinò (sarà un caso?) ha immediatamente trovato un sito per poterlo fare online collaborativamente, che è stato subito utilizzato anche dagli altri. Prima abbiamo visto la proattività dei ragazzi, ora siamo addirittura arrivati alla crescita di team. Si bruciano le tappe quando si capisce il valore di alcune nostre azioni!

La lezione è passata piuttosto in fretta, del resto quando ci si diverte accade spesso. Chiudiamo qui con un compito “facile facile” per la prossima volta, cioè inserire i task nei PBI. Chissà se saranno così bravi da buttare giù anche le stime? Vista la crescita, siamo ottimisti 😊

Stay tuned, la prossima volta tocca a Git!

DevOps journeys series – Vertica release pipeline with Azure DevOps – Ep. 01 – development (part 1)

Intro

As a consultant, life could be difficult when it comes to manage platform like Vertica, a columnar RDBMS by MicroFocus. Speaking about DevOps, database management systems like this one neither is well supported by built-in tools nor by any third party suites.

In my experience, which is focused on the Microsoft SQL Server world, tools like the ones made by Redgate or ApexSQL, plays a crucial role when it comes to DevOps. Unfortunately, this time I cannot find any real help. I think that it’s an exciting task, but I’ve to be careful. It’s like “reinventig the wheel” for a car (Vertica) that didn’t realize that it needs wheels. Strong and reliable wheels.

Scenario

In the scenario I’m working on, the data warehouse is managed by a layer of business logic implemented within this platform. Starting from SQL Server database populated by the application layer, the data rows pass through SQL Server Integration Services ETL packages, which transform them onto Vertica repository, and they end into a Business Objects layer (the presentation layer). Just to get the big picture, see the following diagram:

bi-scenario-scenario

Our mission is to share DevOps knowledge, culture and tools in order to automate a set of processes which are managed manually, right now. Not a simple task, even if the guys I’m cooperating with are well-trained and powerful in tech skills. Additionally, they are enthusiast and ready to change (and we know how this is usually a trouble). We will get obstacles only from a technology perspective, actually.

After days of documentation and questions to our MicroFocus contacts, it looks like that Vertica gives us no built-in way or tool for getting an automated process during the phase of the schema comparison. Also third-party tools aren’t that good. We’re trying to dig more and more in order to find out something on the internet. However, everything it’s a “little bit” tricky. To be honest it seems that no one tried to do DevOps with Vertica, even though this is a very good platform for speeding up heavy queries on huge amount of data. Yes, we downloaded a couple of officially suggested tools, whose documentation says that we can compare from and to Vertica itself, but no one fits our scenario. No command lines, no direct integration, no script generation. If you think about automated pipelines, this can be a big problem to deal with. I think that this should be the foundation of a DevOps approach. In the end, it looks like we’re the the first team that is trying to invest efforts into that. It’s funny, though. Hopefully, someone with experience in Vertica DevOps who reads this post could help us!

(After digging more, I’ve found this article that describes almost the same scenario. I hope to reach out the author out).

Prerequisites

As a kick-off, we’ve moved into the prerequisites, starting from the most important thing: make a process that will facilitate the team’s workday, instead of wasting time due to bad choices. This process should be simple and automated.

Then, we’ve argued about the IDE used by developers, evaluating differences between before and after solutions, getting pro and cons of them all. In the end, we agreed on the following solution, development side:

  • Visual Studio 2017 will be the editor for SQL Server Integration services solutions. This team, “BI team” hereafter, is working on SSIS and is separated from the application development team, at least at the moment;
  • TFVC (Azure DevOps on-premises) will be the Version Control System since the BI team is already using it. We will think about a migration path to git then, but for now we’d like to avoid any distraction out of the scope;
  • every get latest from the source control must synchronize all the DDL scripts for Vertica as well as the SQL Server and SSIS solutions, in order to get a sandbox with source code and the local database provisioning scripts (most likely we’ll get a virtual machine with Unix and a Vertica instance, too);
  • each SSIS project must be deployed to the local SQL Server instance when running solutions into the sandbox;
  • when all the SQL Server Integration Services packages are deployed, the list of Vertica DDL must be executed in order to create the database from scratch;
  • Optionally, mock inserts (also from file) could be added to the database in order to get data to work on.

Our idea

As you can see, in this pipeline, we will get everything we need in our sandbox. Just a note, we can choose how to provision the instance of Vertica, in order to scale out resources from local workstations and also use another O.S. It’s up to the team.

A big picture of this process can be summarized as follows:

001

Conclusions

As we’ve seen, the big picture is ready to be implemented and also the team knows perfectly what are the goals. We already know what technologies will be involved and how to keep them all together in order to make our pipeline.

Unfortunately, we cannot find any tool that helps us, so we’re preparing to jot some lines of code down.

Posting SQL Server notifications to Slack

Introduction

Automation, proactive monitoring, repeatability, reducing waste of time and technical debt. This is something you should know about when trying to do some DevOps.

Why automation? Because you can reduce technical debt and the number of failures that can happen with a manual interaction. You can create environments using a provisioning procedure without falling in common pitfalls like security misconfigurations, wrong configurations and botched monitoring.

Talking about SQL Server, immediate and proactive notifications represent a great step forward toward automation.

We automate whenever we want to stop doing a bunch of recurring or tedious steps manually. At the same time, we are also improving the overall quality and we are reducing the amount of things that can (and will) go wrong.

We are also optimising on how we use our time, because we can just ignore what the automation is doing for us and focus on that something that really needs our attention.

Finally, in this modern and notification-based world, emails generate too much white noise to deal with. In this article, we will learn how to integrate SQL Server tasks’ notifications with one of the most used collaboration tools: Slack.

Keep in mind that this is not the only way to get this done. This guide would help you to better understand why we’re doing this (eventually why DevOps), and not strictly how to do it, even if we’ll see a real working example.

Minimal requirements

You need to setup an account on slack.com (on a paid plan) and a SQL Server edition. I recommend the free developer edition here.

Note: Don’t use SQL Server Express edition. This version doesn’t support any SQL Server Agent task as well as the Database Mail, which we’ll need hereafter. Also, about slack, you must create a paid account, because the integration described below will not work with a free profile.

In order to send emails, we will use an SMTP sever. It can be either a private Microsoft Exchange, PostFix, or any other on-premises solutions, together with a cloud delivery service, like SendGrid, SendInBlue, MailJet, or Office 365.

The scenario

In a team like mine, which uses chat as a daily communication driver, centralizing every business and technical message could be a great step forward for the members of the team in terms of awareness and knowledge sharing. Business roles can use that tool as well, so we can chat to each other switching topics between tech and functional discussions. It’s just a matter of how Slack (in our case) is configured with channels and naming conventions. A good setup helps us to better organize our meetings, small talks and any other topic related to implementations. This is a cool argument to speak about, but a little bit out of the scope of this guide. We will focus on notification bots instead.

SQL Server is able to send emails with its built-in features out-of-the-box, but we’d like to centralize every notification inside Slack, gaining the following advantages:

  • Instant notification
  • Tailored focus (custom sound instead the same popup for all the incoming emails)
  • Opt-out
  • Quickly involve people that are not following the channel by a mention
  • Relay the problem description within the chat
  • Take actions as soon as the notification is received

The proposed solution

Now, how can we send notifications from SQL Server in an easier way than using custom code or a Slack incoming webhook? Is there any integration or a Slack app?  Yes. And guess what? I think you’ll like it because you don’t need to write a single line of code, and you don’t need to choose between CLR, PowerShell or any other language. It’s ironic, but the integration is called “Email”.

Slack

The purpose of this article is just to describe Slack as a collaboration tool. Further details are provided here. As we said before, the following samples work only if you get a Slack account.

The Slack Email integration

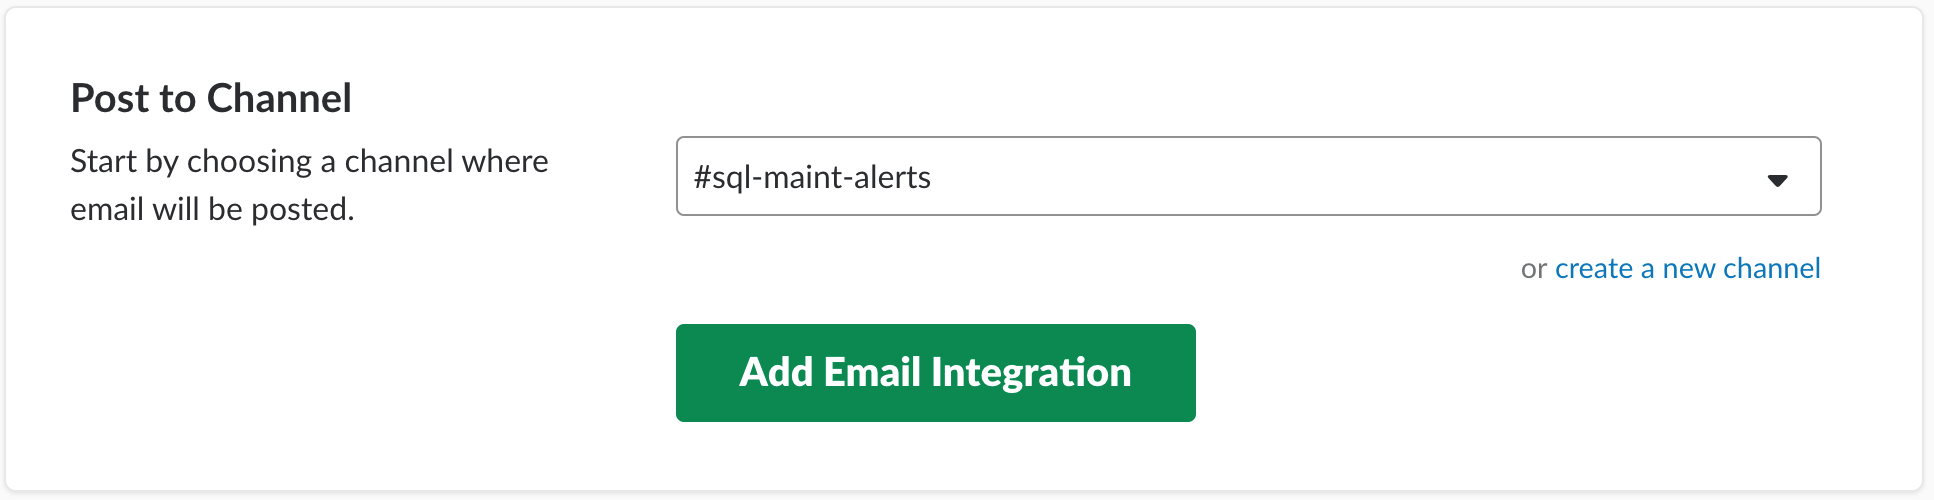
This is the app to work with: Email. Its configuration is based on a four-step wizard:

  • Select the channel (or create a new one).

001.png

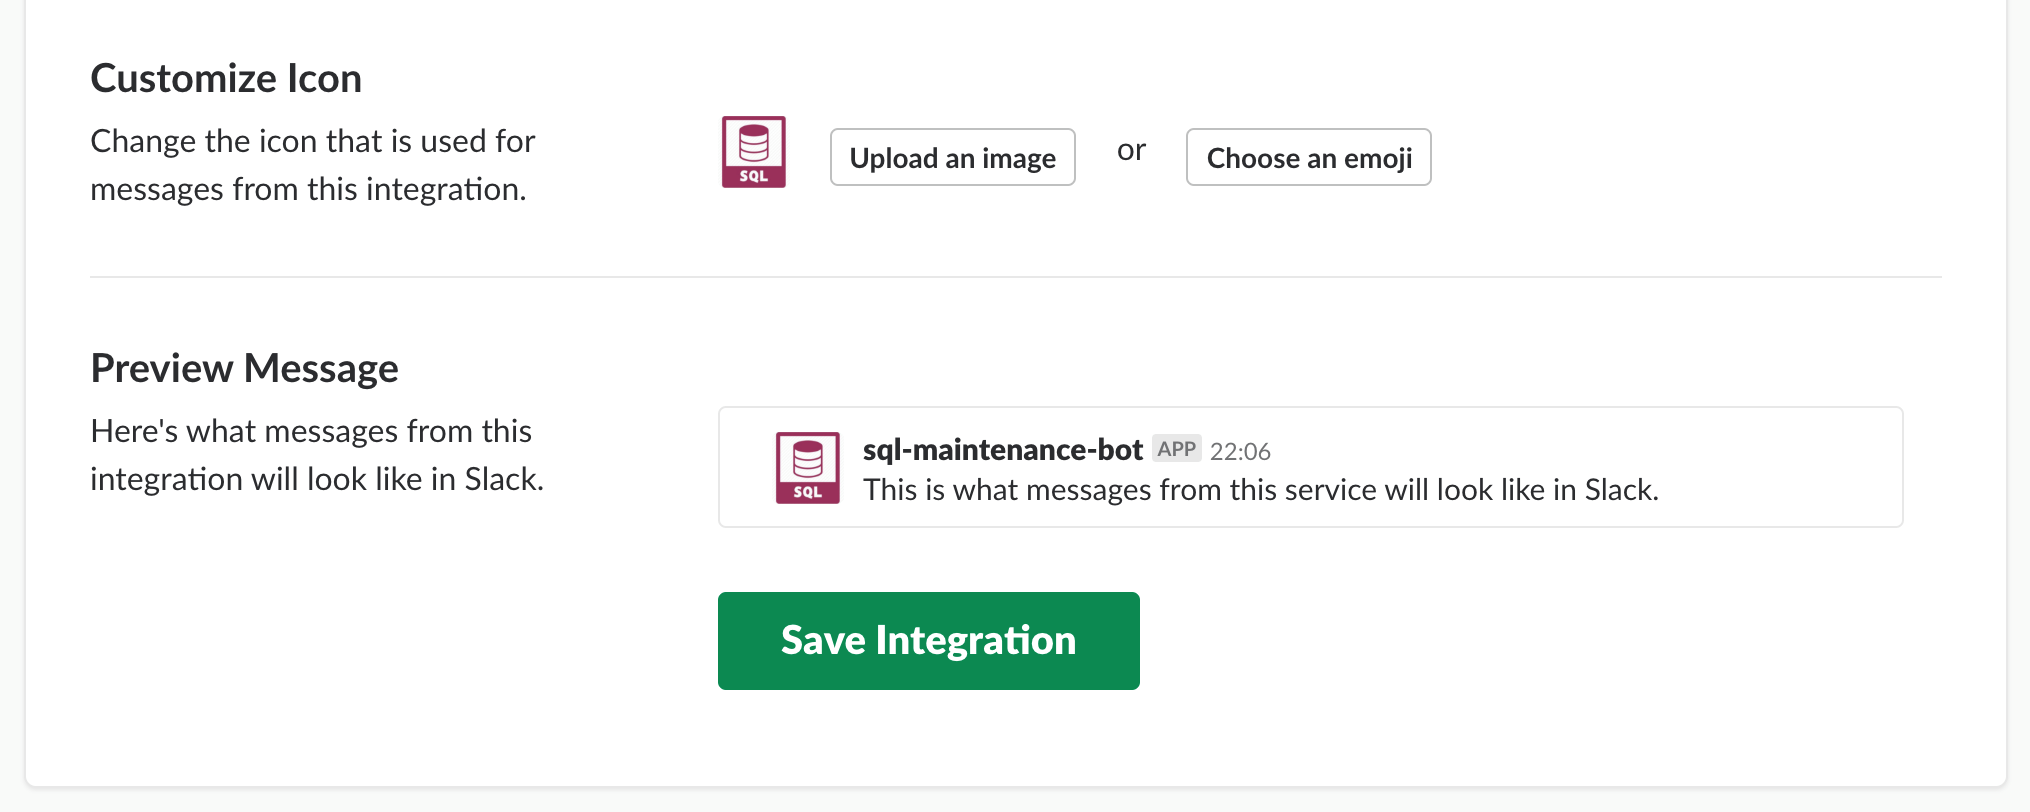
  • When added, set the name and a short description of the new contact (bot) in Slack.

002.png

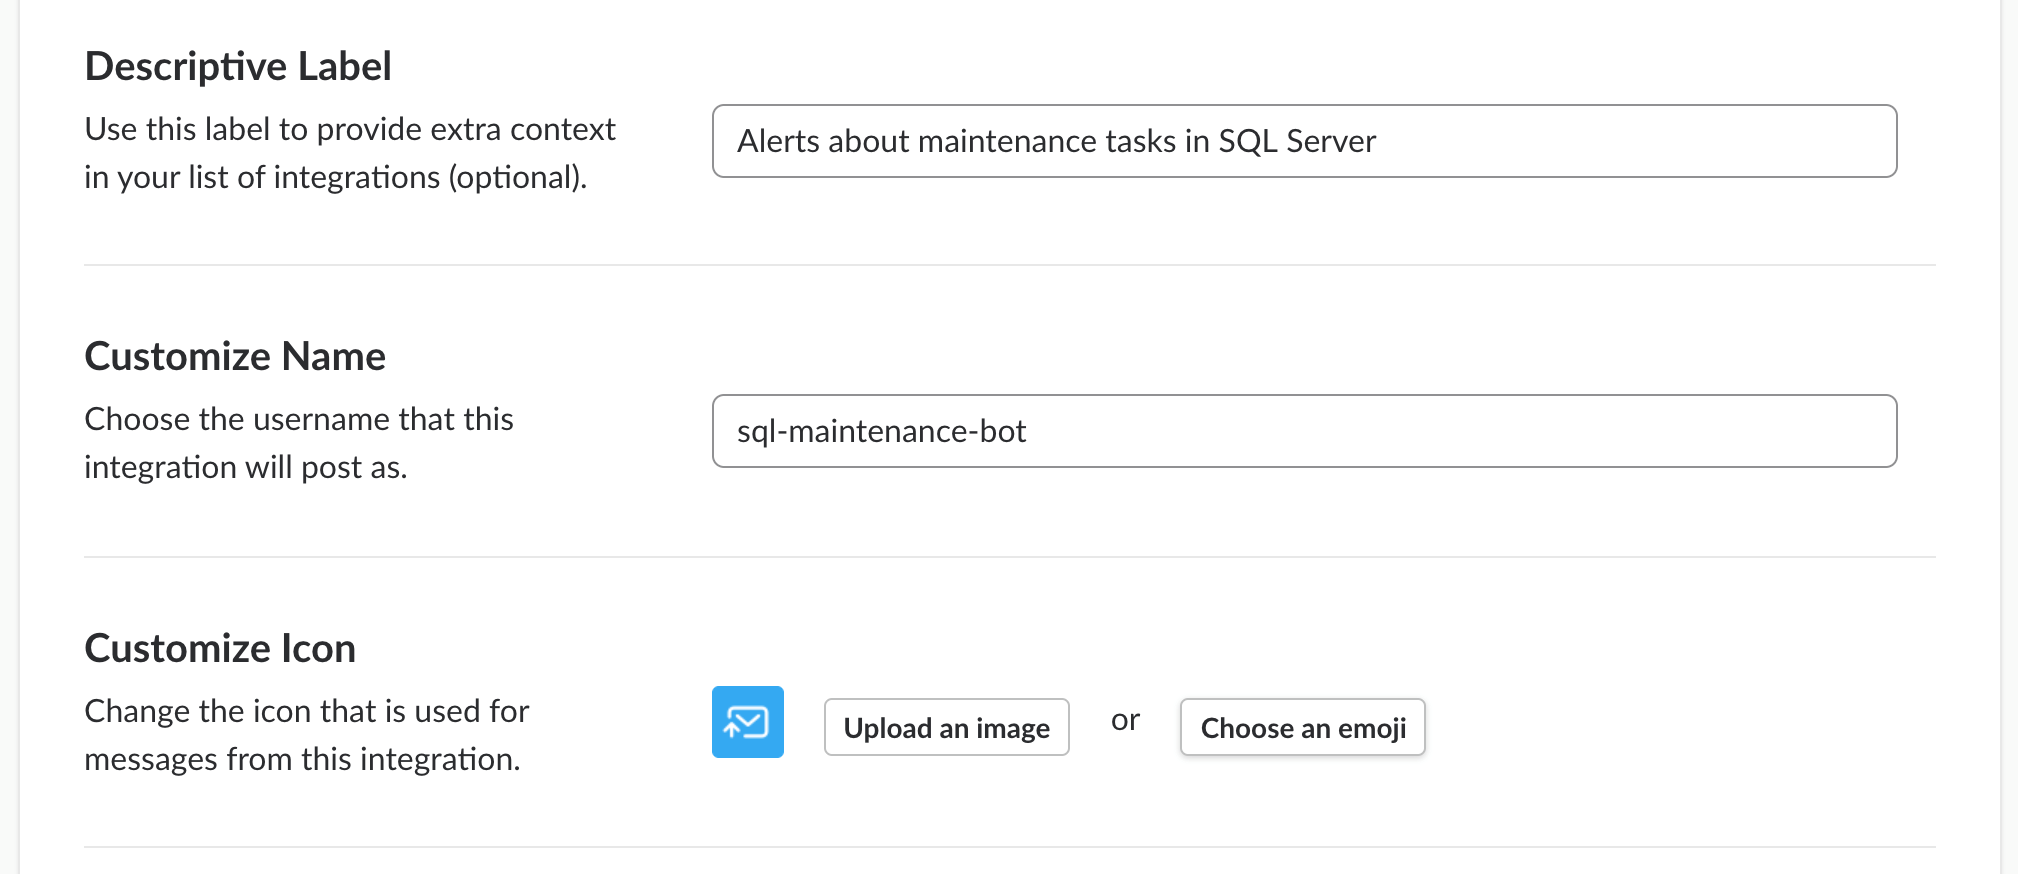
  • Change the avatar (it’s important to recognize the bot at a glance)

003

  • After saving, copy the email address the app created for you.

004

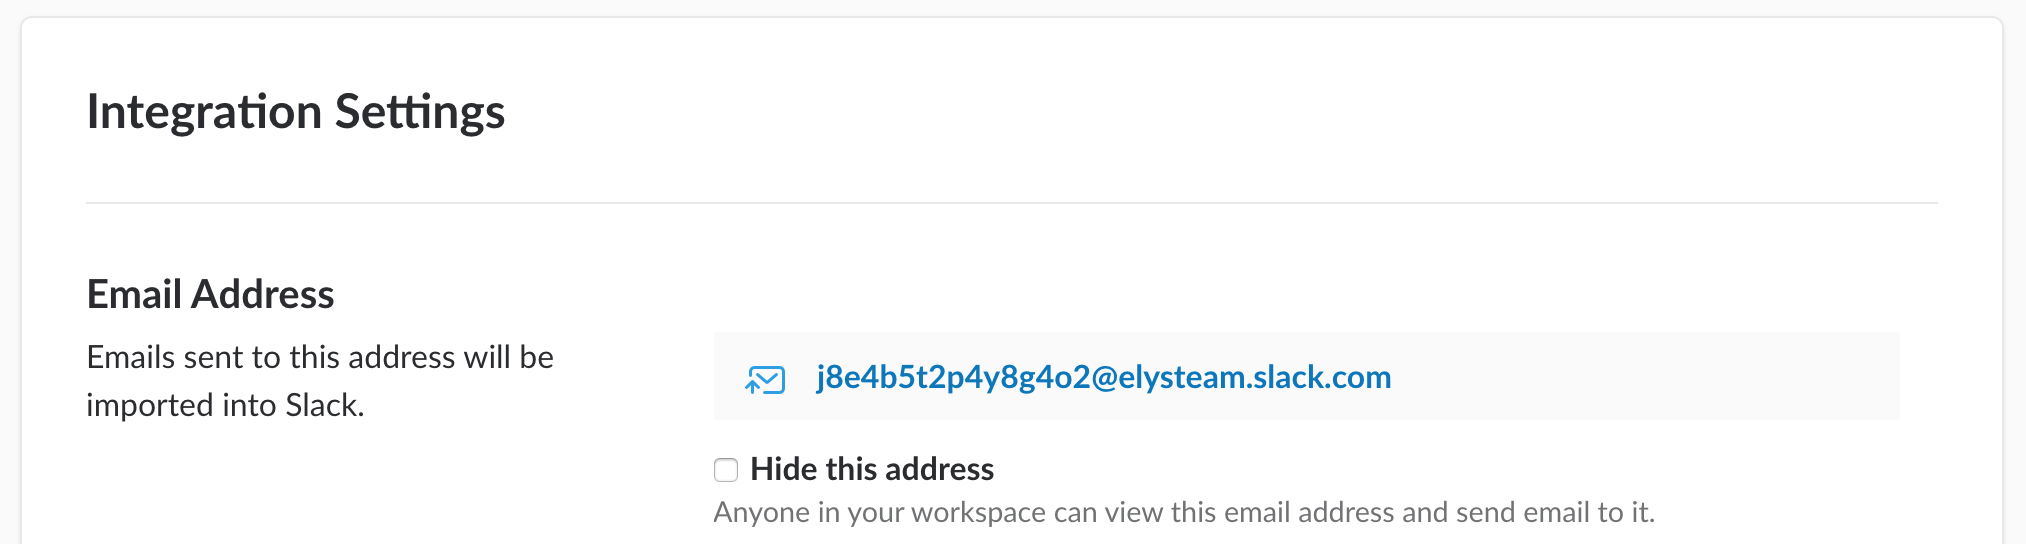
A word about the “Hide this address” checkbox: this is useful if you want to hide the address to any other member of your workspace. You will be the only user able to read it if you check that box.

Type of SQL Server notifications and setup

As a DBA, we’re managing the following types of notifications on a daily basis:

  • SQL Server built-in and custom Alerts
  • Job execution status
  • Integration Services custom emails (within the packages)
  • External monitoring tools (which monitor SQL Instances)

With the exception of SSIS custom emails and external monitoring tools, everything is managed by Database Mail. This is a lightweight layer that allows us to send emails directly from a SQL Server Instance, connecting to a SMTP server.

To setup Database Mail you can follow this guide from Microsoft Documentation.

Once this is up and running, you can manage the notifications using SQL Server Operators. An operator is an alias managed by the SQL Server Agent which you can use to send emails and other types of messages, like pagers and Net Send.

Creating an operator is simple, just invoke the following system stored procedure:

USE msdb; 
GO 

EXEC dbo.sp_add_operator 
    @name = N'<name here>',
    @enabled = 1,
    @email_address = N'<email here>';
GO

If you’re asking what email address you should use, it’s easy to say. You must fill the @email_address parameter with the address returned by the Email app integration for the channel you will send to (j8e4b5t2p4y8g4o2@elysteam.slack.com in the example above). But, what about the name parameter? In my opinion, the best name is the one that helps us to understand where the message will be sent to. Suppose that we’d like to notify something about some index maintenance jobs. We could call the operator Slack Indexes Maintenance, Slack Indexes Maintenance Operator and so on. With such names, you will immediately know what we are going to send to Slack as the topic is related to index maintenance.

Thus, you’ll get the following snippet:

USE msdb; 
GO 

EXEC dbo.sp_add_operator 
    @name = N' Slack Indexes Maintenance Operator',
    @enabled = 1,
    @email_address = N'j8e4b5t2p4y8g4o2@elysteam.slack.com';
GO


Slack channels naming considerations

I’d like to share with you my thought about the channel naming conventions. The principles to follow when naming channels, are:

  • Readability (clear for everyone)
  • Awareness (know what)
  • Style and Rules (know how)
  • Repeatability (keep using it from now on)

That being said, if the channel name describes a single action (like indexes maintenance in the above example) the operator which will send notifications should be unique. The reason is simple enough: we know that Indexes Maintenance Operator is sending messages to #sql-idx-maint-alerts (readability) and everyone knows that this is a one-to-one communication between a SQL Server Operator and Slack (awareness). Everyone knows that the “sql” channel prefix indicates SQL Server-related notification and the “alerts” suffix indicates that is an issue to pay attention to (style and rules). At the same time, everyone knows how to do the same with another pipeline of messages in the future (repeatability).

On the other hand, using a general purposes channel, like #sql-maint-alerts, allows us to be ready to future changes. Suppose that index maintenance will not be the only operation we’re executing in our servers (and typically isn’t). Does it make sense to create a new operator called for example, Database Concurrency Check Operator, which sends to a specific purpose channel? Clearly not.

In the end, a generic purpose channel gives the opportunity to hold more than one topic. All the notification sent to that channel should be, let’s say, of the same category to avoid too much generalization.

These solutions (one channel for more operators or a one-to-one solution) work equally well, it’s just a matter of how you’re designing your Slack channels. I suggest to avoid the “one channel to rule them all” pattern, because you’ll get thousands of mixed notifications without any clear idea behind them. After all, a noisy channel with messy content is something that will not be considered for a long time and will be eventually dropped.

Binding alerts

Alerts are triggers that communicate to an operator that something went wrong. This Brent Ozar’s article offers a good list of alerts that need attention. Here you can find their descriptions, based on severity. The binding is straightforward. All you need to do is to link the operator to the alert:

005006

When one of those events occur, an operator is alerted. Then, it sends the message using its setup – in our scenario, an email. If the operator uses the Slack Email app, the email will be sent to the Email app, and the integration will redirect it to Slack.


Binding job execution statuses

Let’s see how we can use the notification mechanism to monitor SQL Server Agent Jobs. Each job lets you configure what to do in case of failure, success or completion of its execution. The binding is similar to the alert’s one:

007.png

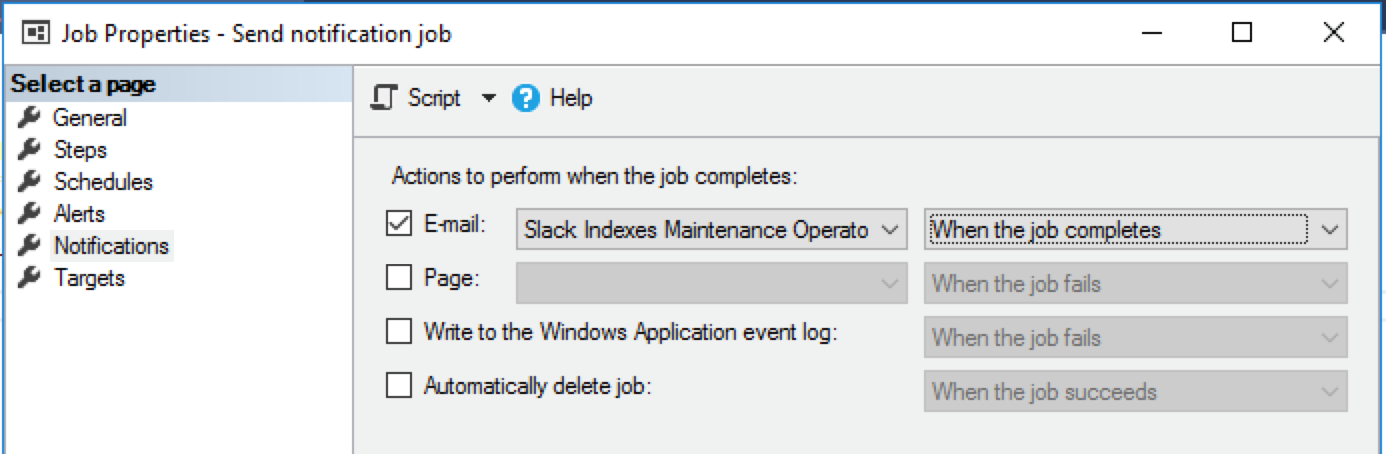
Once the result is collected, based on the configurations you’ve set up, this job will send an email to the app.


Binding custom Integration services email

In order to send an email from a SQL Server Integration Services package (aka .dtsx) you need to configure the SMTP server within the package itself. This is a little out of scope, because it’s not really a SQL Server notification. You can leverage the power of SSIS and prepare a rich HTML-formatted message; the result is nice to read and informative like in these examples:


Cool stuff, isn’t it? It’s simply a .NET script in SSIS, which uses the System.Net namespace. Although the SSIS package is executed within a SQL Server Agent job, the default notification message that SQL generates is not easy to read. The message you always get is:

JOB RUN:<name> was run on <date/time> DURATION: x hours, y minutes, z seconds. STATUS: Failed. MESSAGES: The job failed. The Job was invoked by Schedule xyz (<name>). The last step to run was step xyz (<name>)

Decorating the package with a more detailed email will improve the readability and the accuracy of our notifications.

Setup an external monitor for notifications to Slack

SQL Server is often (hopefully) monitored with specific counters. We’re using PRTG monitoring tool to measure them, and when a baseline changes and a threshold is hit, we send notifications to Slack. How? Again, sending to the Email app integration, specifying the right channel to send to and getting this:

010.png

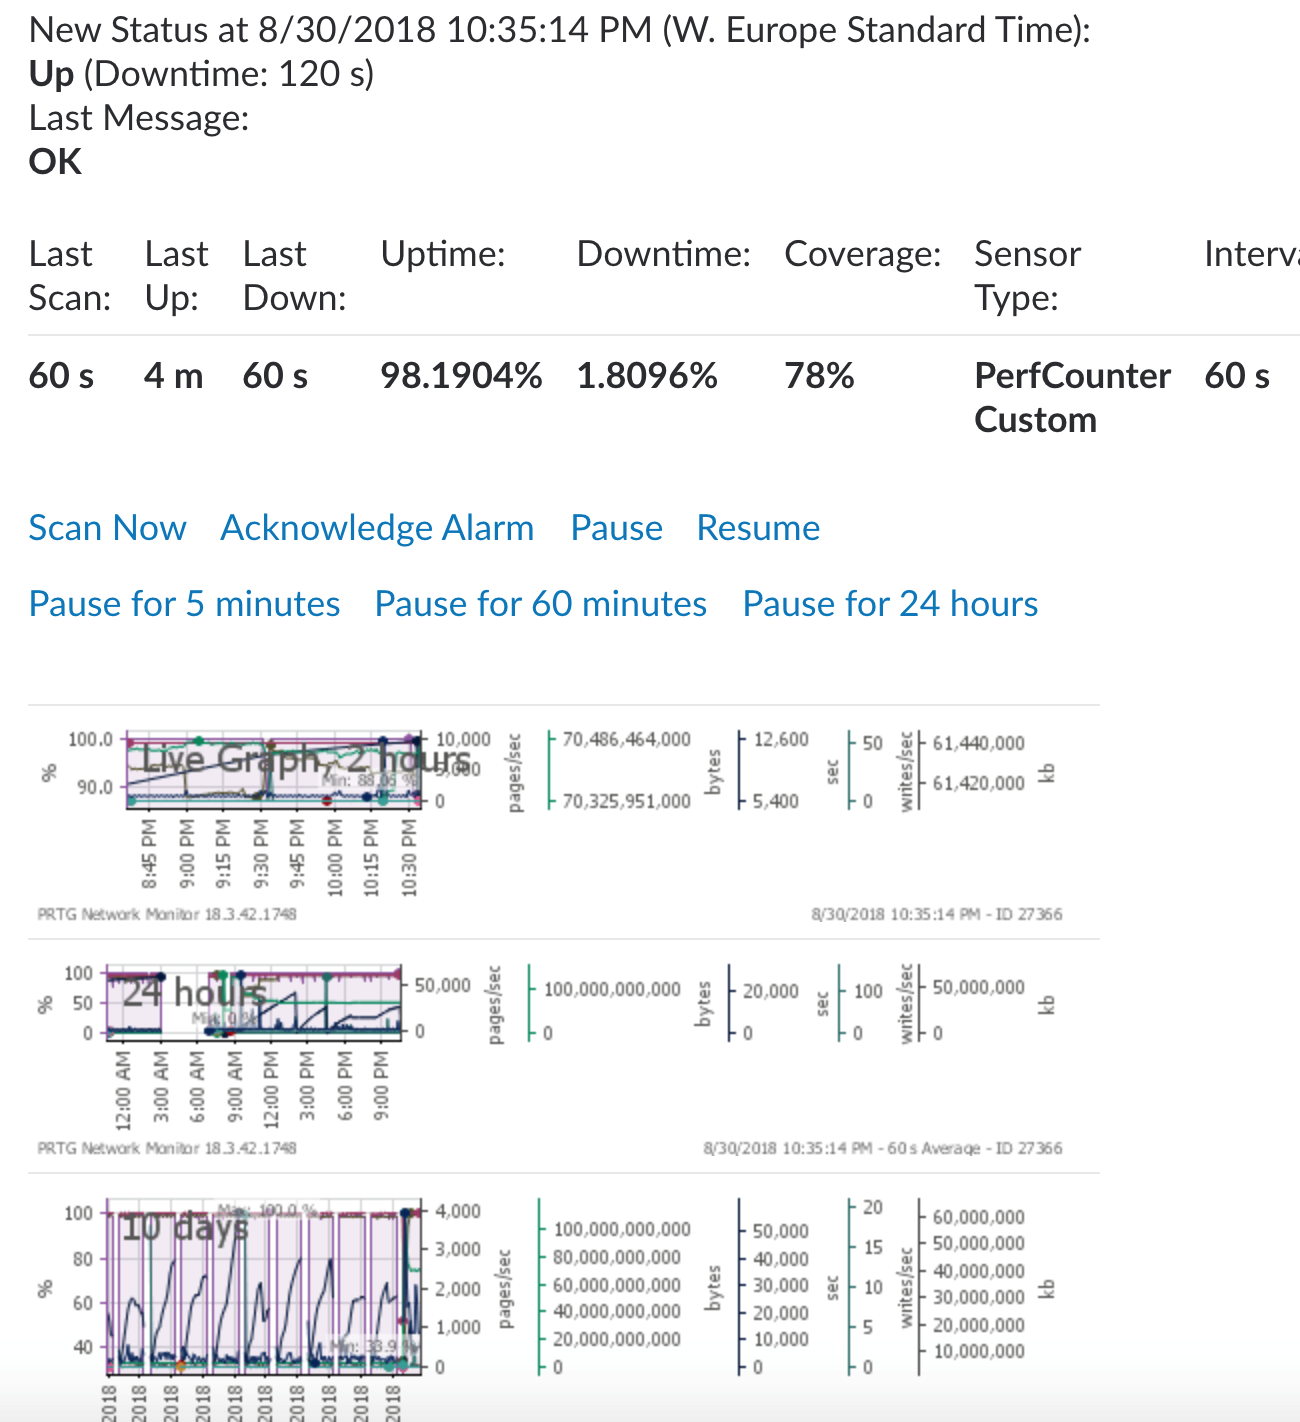
The above report has been truncated. In a complete version of it, you’ll find the complete details of the measures, like the name of the servers, the sensors links, the grid with all the results, and everything you can see inside a PRTG admin portal.


Test

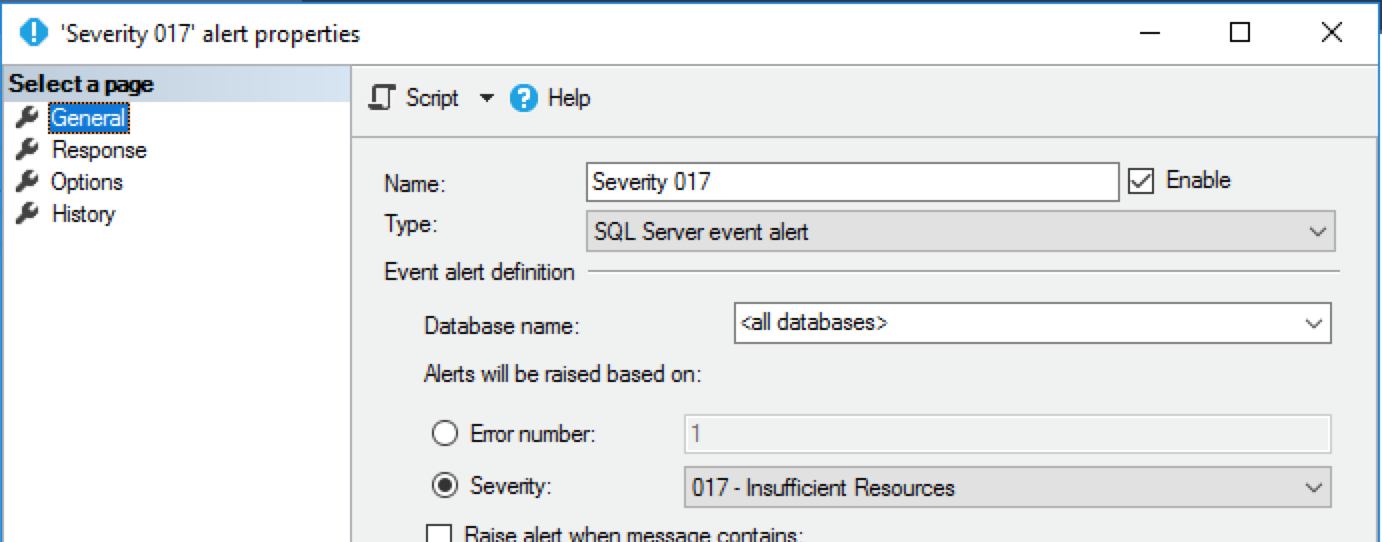
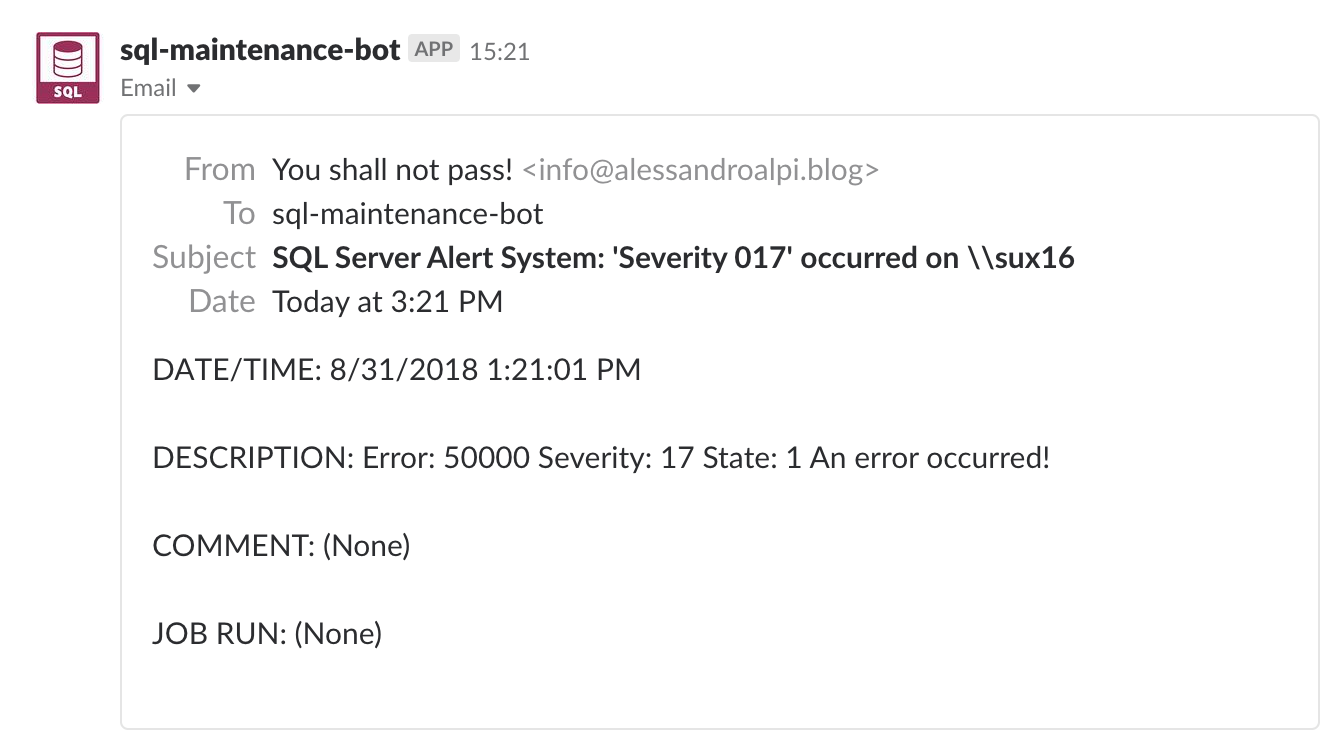
Let’s see a more complete example, using a SQL Server alert. We’ll use the Severity 17 alert. Severity 17 is simple to raise and it describes a missing or insufficient resource when executing a command:

USE msdb; 
GO 

EXEC msdb.dbo.sp_add_alert @name=N'Severity 017',
    @message_id=0,
    @severity=17,
    @enabled=1,
    @delay_between_responses=60,
    @include_event_description_in=1,
    @job_id=N'00000000-0000-0000-0000-000000000000';
GO

Set the Response for the Severity 17 alert to “Notify Operator”, via email:

006

Run the following severity 17 based t-sql script:

RAISERROR(N'An error occurred Severity 17:insufficient resources!', 17, 1) 
WITH LOG; --don’t forget to use WITH LOG
GO

Go to your Slack account. If you’ve configured everything correctly, you should see the following:

011.png

Did it work? Great! If not, continue reading.


Troubleshooting

If you don’t see the notification try these steps:

  1. Be sure that your Slack account is confirmed (its email too)
  2. Once the Slack account is confirmed, check if the channel still exists (CTRL+K -> name of the channel)
  3. Click on “Customize Slack” in the drop down menu of your Slack client/webpage, then click on Customize App in order to check whether the Email integration is active or not:

012

013.png

  • Verify Database Mail configuration (try to send the test email)
  • Verify the operator configuration (is it enabled?)
  • Verify the alert configuration (did you bind the response with email to the operator? Is it enabled?)
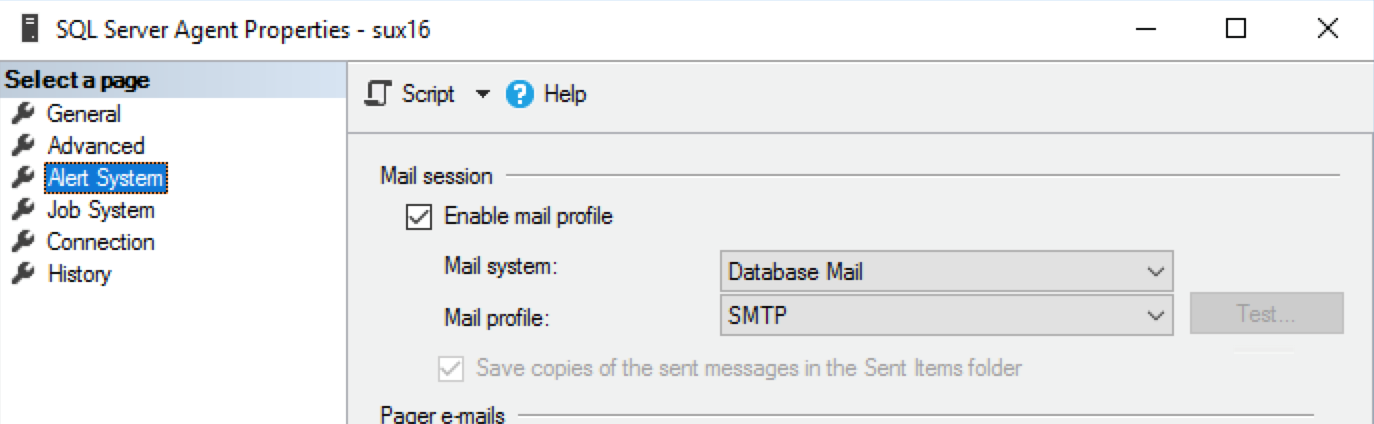
  • Verify the SQL Server Agent email profile configuration (is it enabled? Is it the right one?)

014

Conclusions

There are some disadvantages when using this kind of integration. For example, you cannot customize the message, unless you do it inside a .NET script. The Slack Email Address is publicly available, albeit hard to discover, so anyone can send message to your private slack channel by sending emails to that special address. Again, you cannot send the notification to more than one Slack channel or outside of the Slack world. In reality native SQL email notifications show the same limits, where email addresses of distribution lists are similar to Slack channels.

For our purposes, this is a very-low-effort automation with a high return in terms of value. With a couple of clicks, you can setup an email address representing a Slack channel, and, with little more, you can get notifications in a smart and comprehensive layout.

Everything is kept inside the collaboration chat tool we are using massively, every day. In the end, this example embeds one of the core DevOps principles (automation) and provides huge cross-role and cross-team value, especially when the channels include also network and server teams.

I hope that you’ll give this a try.

Agile@School – Anno terzo – Apertura del progetto

Siamo già al terzo anno consecutivo. Il tempo vola, ma devo dire che i progetti che sono nati in Engage IT Services sono anche solidi, graditi e duraturi. È successo con gli eventi (quest’anno ben tre per coprire i trend topic IoT, DevOps e il nostro SQL Saturday) e accade anche con Agile@School. Pensate che nel 2017 abbiamo “aperto” anche una nuova realtà in quel di Rovigo, grazie a Michele Ferracin (qui i suoi post in reblog e le statistiche finali). Insomma, il motore gira, forte e non dà cenni di arresto. Quindi siamo qui, 2018 nuovo vestito per il progetto e la scelta di scrivere i post ad esso relativi in italiano, anche per rispettare quanto fatto nel nostro Paese.

La nostra azienda è finalmente entrata a far parte di un progetto più ampio di Alternanza Scuola Lavoro per la nostra scuola di riferimento (I.I.S.S. Gadda di Fornovo, Parma) per cui, a differenza delle edizioni precedenti, quest’anno potremo sfruttare un intero mese. Gli studenti non avranno più incontri isolati ma una serie di giornate consecutive di lavoro “sul pezzo”, senza dispersioni e senza includere ore extra scolastiche, sulle quali è piuttosto difficile investire per gli adolescenti. Ma non solo, quest’anno abbiamo anche un “corpo docenti”: non mancherà chi ci ha supportato fin dall’inizio (la prof. Pinella Pedullà, informatica e tecnologia) ma avremo anche importanti aggiunte, come il prof. Stefano Saccani (informatica), la prof. Enrica Groppi, il prof. Graziano Maniello e tutti quanti hanno supportato il progetto “donando” le ore del normale programma di studi.

Edizione 2018

Partiamo con la descrizione di Agile@School 2018. Due anni fa, l’edizione pilota, spiegammo ad una decina di ragazzi di quinta superiore come affrontare un singolo progetto in agile (Scrum), mentre l’anno scorso abbiamo optato per un’idea multi-progetto e multi-team con supporto di kanban board. In entrambi i casi, la base è stata Visual Studio Team Services utilizzato con template differenti.

L’approccio

Quest’anno Gabriele Etta (lo ringrazio per essermi sempre di aiuto) ed io abbiamo optato per lasciare libertà agli studenti, concentrando l’iter sulla self-organziation e sul principio di responsabilità. L’obbiettivo è in definitiva quello di raggiungere un approccio “dal basso verso l’alto” (bottom-up) in cui scelte e proattività vincono su comando e controllo. Come? Ponendo gli studenti di fronte ai problemi, lasciandoli fare, sempre nell’ottica della realizzazione di un prodotto/servizio. Ovviamente la nostra presenza è quella che consente loro di ottenere consigli pragmatici su comportamenti e strumenti disponibili.

img_20180517_083248.jpg

Le novità

Questa edizione porta con sé differenze anche per la classe ed il numero di persone. Una ventina di ragazzi di terza, che molto probabilmente incontreremo ancora nel 2019 e, perché no, anche nel 2020. Ed è questa la vera novità. Agile@School sarà un progetto a lungo termine, non dedicato ad un solo anno scolastico. Approfondiremo la conoscenza con gli studenti e potremo valutarli anche su più aspetti, nel tempo. A mio modo di vedere ciò corrisponde ad un grande valore aggiunto per gli studenti, per la scuola e per noi. Un percorso da seguire tutti insieme.

Il primo incontro

Nella prima “puntata” abbiamo affrontato un punto delicato della comunicazione. Il farsi conoscere, capire le proprie attitudini ed esporre i propri interessi. Ma non solo, uno dei primi passi per responsabilizzare i ragazzi è stato quello di selezionarsi a vicenda, di lasciar costruire i team naturalmente, senza imporre nulla. Certo, abbiamo cercato di far capire che un team può essere costituito da ruoli diversi e che non è una cattiva idea far crescere anche persone che non sono “forti” in particolari ambiti, ma quello è stata l’unico consiglio. Abbiamo in poco tempo ottenuto cinque team, due dei quali da cinque elementi e tre da quattro.

I progetti

I professori prima dell’incontro hanno creato un elenco di cinque idee, tutte orientate al mondo dell’IoT e, per essere più precisi, al rapporto tra l’informatica e l’elettronica ai giorni nostri. Tutti i progetti sono basati su Arduino e sul kit di sviluppo con esso fornito. Ogni idea è vista come una “partenza”, che corrisponde al requisito minimo e necessario ma che, allo stesso tempo, può essere estesa e resa “personalizzata” a scelta del team, con analisi, implementazioni, studi e rischi annessi. Nel prossimo post descriveremo meglio i contenuti, ma possiamo affermare che la base è tendenzialmente la gestione di sensori di vario genere e la presentazione su web con utilizzo di storage per il salvataggio degli eventi che si verificano. Il prof. Saccani, dopo la presentazione dei progetti, ha osservato con noi i ragazzi procedere alla creazione autonoma dei team e all’assegnazione di progetti. Dopo un primo conflitto di preferenza (ogni idea poteva essere assegnata ad un solo team) e dopo aver capito la possibilità infinita di estensioni applicabili in ogni ambito, le squadre hanno concordato le assegnazioni finali.

img_20180517_101351.jpg

Le cerimonie

Il primo meeting che è stato suggerito ai ragazzi è il daily meeting. Con un’occasione del genere (tutti i giorni a lavoro per un mese, ricordo) non potevamo fare altrimenti. Abbiamo spiegato le tre fatidiche domande, illustrando i modelli di risposta accettabile e non, ponendo l’attenzione sui tempi e sul livello di dettaglio. Fare il daily meeting è stato uno dei compiti assegnati a tutti.

La gestione delle attività

Come strumento per il task management abbiamo suggerito Trello e come chat collaborativa Slack, cercando di non consigliare altro. Come compito, alla fine della settimana, ogni team dovrà aver ideato un nome per il proprio “prodotto”, un’analisi iniziale, soprattutto funzionale, e una relazione per descrivere i casi d’uso. E chiaramente dovrà presentarlo, simulando una sorta di “ricerca fondi” da investire nella produzione concreta del prodotto stesso. Proprio come una piccola startup.

Per chiudere

Tutti ci aspettiamo soddisfazioni da Agile@School 2018 e confidiamo nel fatto che sia una buona base per i prossimi anni. Le premesse sono più che soddisfacenti, ma dovremo valutare passo dopo passo, cercando di adattarci al cambiamento. Al prossimo appuntamento…

Stay tuned! 🙂

Managing migrations with RedGate SQL Source Control 5

This is a good day for me. I’ve finally tried the improved migrations feature in the latest version of RedGate SQL Source Control  and I’ve tested the feature against all my typical cases so that I can share my findings with you.

What is the migrations feature?

When a change set includes an edit which leads to data loss (or a deploy schema error due to constraints definitions), we need to create a script that avoids any regression/block during the deployment phase. This is true also when working as a distributed team in a continuous integration based environment. We need to avoid members of our team being blocked any time changes are shared and minimize the risk of regressions.

Migrations in SQL Source Control means “migration SQL scripts”. We are speaking about custom scripts, related to the changed objects, that let us avoid regressions. They are created whenever there is a likelihood of a potential problem or data loss occurring on an object and inserted when getting the latest version of our database from our source control system. But the most important thing is that they are applied when deploying our databases to the test/staging/production environments.

Migrations feature history

A migrations feature has been implemented more than one time into Redgate SQL Source Control unfortunately with some trouble, especially when trying to merge the migration scripts between different branches and to integrate the most recent source control systems. (You can read a brief history of migrations in SQL Source Control in this blog post). However, the latest version of migrations in SQL Source Control v5 is a great implementation, which supports also a generic Working Folder (no matter what version control system is installed, we are just using a simple folder). So, you may hear about the previous versions, Migrations V1, V2, and you will find some capability in SQL Compare projects, but, using the new migrations feature in SQL Source Control v5 will resolve everything.

A real scenario

The environment I’m working on is a multi-branch scenario, implemented in Visual Studio Team Service, like the following one:

  • A VSTS local workspace folder mapped to the VSTS team project
  • A local folder for each branch (dev main | release), mapped to the VSTS branches
  • The folder of the database in each branch

The purpose of this article is to demonstrate what are the capabilities when managing two typical cases. The first is about a breaking-change, a NOT NULL column addition to a table. The second is a data-only migration script, which can be inserted during the deployment phase.


Migration for NOT NULL column addition

Adding a NOT NULL column to a table can lead to a potential delivery problem. Indeed, in a dev environment, when a developer tries to get the change and the target table has rows, the NOT NULL constraint will be violated. The same could happen in any environment when deploying.

When this kind of change occurred, I used to create a “Pre-release” script for adding the column with NULL, then writing data inside it and finally, adding the NOT NULL constraint. This was manually managed – until now – and it took me some time, typically the day before the deployment (it’s not usually just a matter of a single table). I had to create sql scripts, folders, naming conventions and I had to remember to execute them. When we’re talking about automation, this is a step backwards and it opens us up to the risk of human error. Last but not least, this is a more complex solution to setup on the deployment software we are using, Octopus Deploy.

In the following scenarios we will try to understand what will happen when:

  • replacing a schema change with a migration script
  • sharing change set with other developers
  • merging the branches
  • using data-only migration script


Replace a schema change with a migration script

When we need to replace the schema change with our script, a schema-data-schema migration script is the best choice.

Suppose we have two developers, Dev1 and Dev2, who are working with a dedicated database model on SQL Source Control on the dev branch. They have the same table in their databases (StoreDb), called Inventory.Items (ItemId int PK, Name varchar(30), CategoryId smallint)Dev1 table is empty, while the Dev2 one has ten rows. Dev1 executes the following command:

Use StoreDb;
GO

ALTER TABLE Inventory.Items ADD InsertTimestamp datetime NOT NULL;
GO

Since the table is empty for Dev1, the command is executed successfully. But Dev1 ignored the potential problems about data loss/constraint violation. Fortunately, SQL Source Control warns him when he tries to commit the changes:

01 - warn changes

Dev1 can add a migration script, related to the object that is changed:

02 - Migration script

Pressing “Generate script” of the selected object will show the proposed t-sql migration script:

03 - Script

As you can see, the proposed script is not really “completed”, because it’s up to Dev1 to add the desired behavior for the new NOT NULL column. The highlighted part is the migration addition. However, the change that should be added is simple and quick.

Dev1 can “Save and close” and the commit tab becomes as described in the picture below:

04 - SaveAndCommit

The generated migration script replaces the suggested schema change. This allows us to avoid any constraint violation.


Sharing changes to other developers

What is going to happen on the other developers’ workstations? When Dev1 execute a check in of the column addition change, Dev2 can get the latest version of the database. Keep in mind that Dev2 has already the database with the Inventory.Items table, with ten rows, a version without the Dev1 change.

06 - table

They are using Working Folder, so they need to get the files from the source control (VSTS, using team explorer, for example) and then apply changes to the databases. Dev2 can see the following:

05 - Get

Without the migration he receives errors (NOT NULL constraint violated), while the migration let him go ahead. Indeed, the get latest works and the ten rows have been updated with the logic of the migration script.

07 - table updated

Merging branches

What if Dev1 and Dev2 merge the branch they are working on with another line? Suppose that Dev2 starts a merge process between dev and main branches. Getting the latest version from the main branch will behave in the same way. This means that the migration script is replicated also switching the repository. This didn’t work in the past, and I can definitely say that is working well now. This is a great point, especially when frequent merges occurs.


When using data-only migration scripts?

When the change has been already committed and we need to update the data on the changed object, the data-only (blank) migration script is the right choice. The “split column” or “merge columns” refactors are good examples.

08 - Split

In the split column scenario we have:

  1. create the new columns, then commit
  2. add a migration script for updating values from the composite column, then commit
  3. drop the composite column, then commit

09 - merge

In the merge columns scenario we have:

  1. create the new column, then commit
  2. add a migration script for aggregating values from the other columns, then commit
  3. drop the other columns, then commit

In both cases, sharing or deploying will deliver the changes respecting the commit order. You can read the migrations samples here.


What SQL Source Control does under the hood?

A deployment script that involves migrations consists of compare blocks and migration blocks:

10 - blocks

RedGate SQL Source Control creates a set of items inside a “Custom Scripts” folder, which is inside the folder of the database itself:

  • <datetime> ue auto: configurations and settings about the comparison (also the RedGateDatabaseInfo.xml)
  • <datetime> uf user: migration script (sql script and json files for transformations)
  • DeploymentOrder.json file, which is the order of migration deployment

Additionally, a RedGateLocal.DeploymentMetadata is added into the database. This table contains the list of executed migration scripts on the database and it allows us to avoid any duplication when the scripts are applied. More details here.

What about the deployment phase?

SQL Source Control is not used for delivering changes to test/staging/production environments. The other tools in the Redgate SQLToolbelt able to do that are SQL Compare and SQL Data Compare, which compare structures and data, or DLM Automation which plugs into your release management tool.

As the get/apply processes, the comparison one will check for the set of items into the “Custom Scripts” folder and will look up the entries on the RedGateLocal.DeploymentMetadata table, respecting the SQL Source Control commit order. If the migration has been already delivered, it will be skipped, in order to avoid any double execution. This means that we will find the table also in our test/staging/production environments.

Conclusions

The “Migrations” feature in SQL Source Control v5 comes finally with a great implementation. The suggested scripts are good, everything is clear and simple to understand. Additionally the user interface changes are welcome, also speaking about style. The great point is, in my opinion, the advantage that we can get from automation. All manual operations, which were necessary before this release, suddenly disappear. We can simply insert the folder into Octopus (or TeamCity, or another deployment tool) and execute the comparison against our environments avoiding regressions and data loss.

That’s the way we like it!