Recently I had to create a backup procedure on my Windows Azure SQL Database. SQL Server Management Studio allows us to access to our SQL Databases and provides the user interfaces for creating backup files.
In this post we will understand:
- how to create a Azure SQL Database copy
- how to save a logical file backup on the cloud storage
- how to restore the logical file on a new Azure SQL Database
Since the database copy can be considered as a full backup, we want to create also a file in order to place it on another place, that could be a local or a cloud storage.
First of all, we need to familiarize with DACPAC and BACPAC file concepts (aka Data-tier applications). Long story short, a DACPAC is a portable package that keeps data tier objects (SQL objects, credential included) and a BACPAC is a related file with the database schema and data.
We have to create a BACPAC file in order to accomplish our goal, backup the Azure SQL Database.
Then, we need a connection to SQL Databases with SSMS, as described in this section of the Windows Azure documentation.
1) Create a database copy
T-sql will help us to create a database copy:
CREATE DATABASE DBSource_Copy AS COPY OF DBSource;
The command above MUST BE executed with master database context. USE statement is not allowed. If we try to execute it we’ll receive the following error:
Msg 40508, Level 16, State 1, Line 1
USE statement is not supported to switch between databases. Use a new connection to connect to a different Database.
Why we need a database copy? Because we want create a BACPAC file, and we need an isolated copy of the data. We can read the explanation in the Windows Azure documentation:
“To make sure that you have an isolated copy of the data which is transactionally consistent, you must first create a database copy, and then create the BACPAC file from the copy. Alternatively, you can also prevent modifications to the data in the databases during export by limiting access to the databases through permissions or connections. Use the following steps to create a backup of the SQL Database.”
That’s it, we are following the first suggestion.
Taking a backup copy is like doing a full backup in our on-premise SQL Server database. But in this post, we want to create the BACPAC file in order to store it on a different place.
2) Create a logical backup file (BACPAC)
As we said before, our BACPAC file will contain the database schema and data. We can choose between t-sql or SSMS , let’s do it with the Management studio ui.
Once we’ve created the copy of the Azure SQL Database (we called it DBSource_Copy in the statement above), press the right mouse button on it and select Export Data-tier Application.. A wizard will appear (second page, after the intro):

We can choose the BACPAC file locally (useful if you want a backup on your own storage) or directly on the Windows Azure cloud storage. In order to save the file on the cloud storage you have to specify the credentials (storage account keys), pressing the Connect button:

You can find your keys on the Windows Azure portal, selecting the storage you want to use and pressing the Manage Keys option on the bottom menu:

After a short verification the connection to the storage will be established. Now, we’ve to choose the container (blob) where we want to save the BACPAC file. If you don’t have any container you can create it directly from the Windows Azure portal, navigating the cloud storage –> CONTAINERS option:

Follow the instruction, setting also the type of storage access (private in our example), and the container will be created in a short time. After this we can refresh the connection and choose the container to work with.
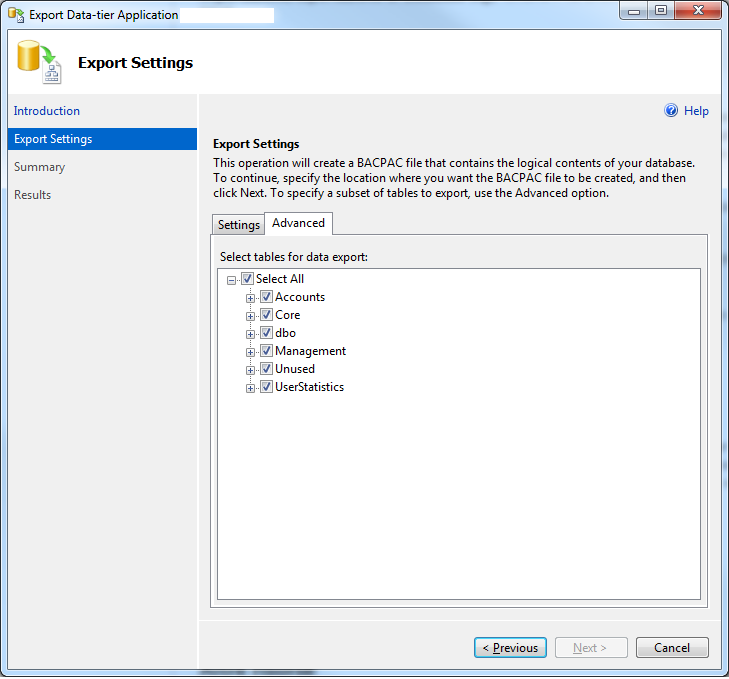
The wizard displays also an Advanced tab with which we can include/exclude schemas/objects from our BACPAC file. For a full backup, leave the selection as is (all objects selected):
After the summary window, we can execute the process and, after a while, we will receive the following report:

It worked, but in case of error the report will be somehow different.. however, the backup was made, it’s time to test it.
3) Restore BACPAC file
Like the backup operation, the restore of our Azure SQL Database can be executed directly from SSMS.
Right click on Databases folder and select Import Data-tier application..
A similar wizard will pop-up, one of the differences is the File Name field when connecting to the cloud storage:

As you can see it is possible to browse the cloud storage for getting the right BACPAC file.
The destination database will be set on the next window:

The server name is shown on the first text box and the only thing we’ve to add is the name of the destination database (a new or an existing one). In addition we can change also the edition and the max size of the database.
If you need further information about the SQL Database edition, read this link.
After the restore operation the database is available and we can use it.
If you want these steps using the Azure Management Portal, you can find the Import/Export operations on the SQL Database section:

Next to the two operations there is also an Add sync option with which you can synchronize On-Premise and Azure SQL Datbases or a complete Azure SQL Databases environment. If you need further information on this topic, follow this link.
Stay tuned! 🙂


Reblogged this on Cloud & Virtualization Complete Guide.